Defining a GMP critical system is an essential aspect of Good Manufacturing Practices (GMP) in the pharmaceutical and medical device industries. A critical system is one that has a direct impact on product quality, safety, and efficacy.
Key Characteristics of GMP Critical Systems
Direct Impact on Product Quality: A critical system is one that can directly affect the quality, safety, or efficacy of the final product.
Influence on Patient Safety: Systems that have a direct or indirect influence on patient safety are considered critical. This is where CPPs come in
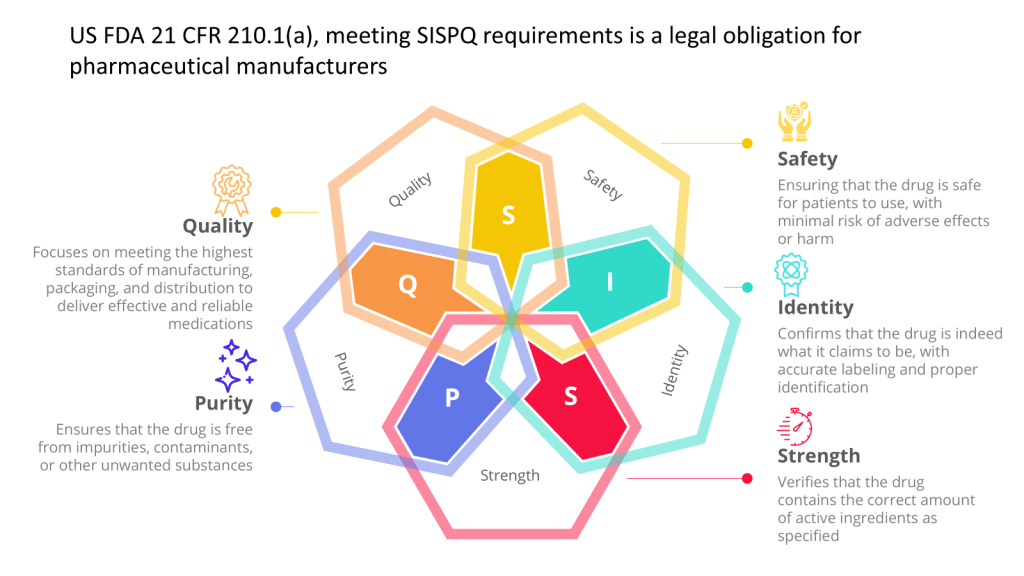
Data Integrity: Systems that generate, store, or process data used to determine product SISPQ (e.g. batch quality or are included in batch processing records, stability, data used in a regulatory filing) are critical.
Decision-Making Role: Systems used in the decision process for product release or a regulatory filing are considered critical.
Contact with Products: Equipment or devices that may come into contact with products are often classified as critical.
Continuous Evaluation
It’s important to note that the criticality of systems should be periodically evaluated to ensure they remain in a valid state and compliant with GMP requirements. This includes reviewing the current range of functionality, deviation records, incidents, problems, upgrade history, performance, reliability, security, and validation status reports.
“The specification for equipment, facilities, utilities or systems should be defined in a URS and/or a functional specification. The essential elements of quality need to be built in at this stage and any GMP risks mitigated to an acceptable level. The URS should be a point of reference throughout the validation life cycle.” – Annex 15, Section 3.2, Eudralex Volume 4
User Requirement Specifications serve as a cornerstone of quality in pharmaceutical manufacturing. They are not merely bureaucratic documents but vital tools that ensure the safety, efficacy, and quality of pharmaceutical products.
Defining the Essentials
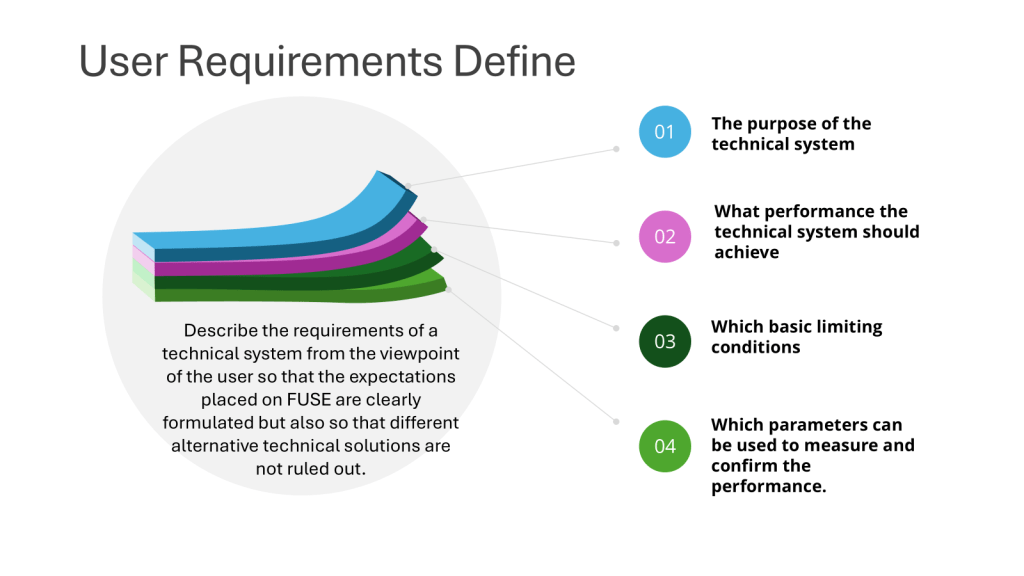
A well-crafted URS outlines the critical requirements for facilities, equipment, utilities, systems and processes in a regulated environment. It captures the fundamental aspects and scope of users’ needs, ensuring that all stakeholders have a clear understanding of what is expected from the final product or system.
The phrase “essential elements of quality need to be built in at this stage” emphasizes the proactive approach to quality assurance. By incorporating quality considerations from the outset, manufacturers can:
Reduce the need for costly corrections later in the process
Ensure compliance with Good Manufacturing Practice (GMP) standards
Mitigating GMP Risks
Risk management is a crucial aspect of pharmaceutical manufacturing. The URS plays a vital role in identifying and addressing potential GMP risks early in the development process. By doing so, manufacturers can:
Ensure that the final product meets regulatory requirements
The URS as a Living Document
One of the key points in the regulations is that the URS should be “a point of reference throughout the validation life cycle.” This underscores the dynamic nature of the URS and its ongoing importance.
Continuous Reference
Throughout the development, implementation, and operation of a system or equipment, the URS serves as:
A benchmark for assessing progress
A guide for making decisions
A tool for resolving disputes or clarifying requirements
Adapting to Change
As projects evolve, the URS may need to be updated to reflect new insights, technological advancements, or changing regulatory requirements. This flexibility ensures that the final product remains aligned with user needs and regulatory expectations.
Practical Implications
Involve multidisciplinary teams in creating the URS, including representatives from quality assurance, engineering, production, and regulatory affairs.
Conduct thorough risk assessments to identify potential GMP risks and incorporate mitigation strategies into the URS.
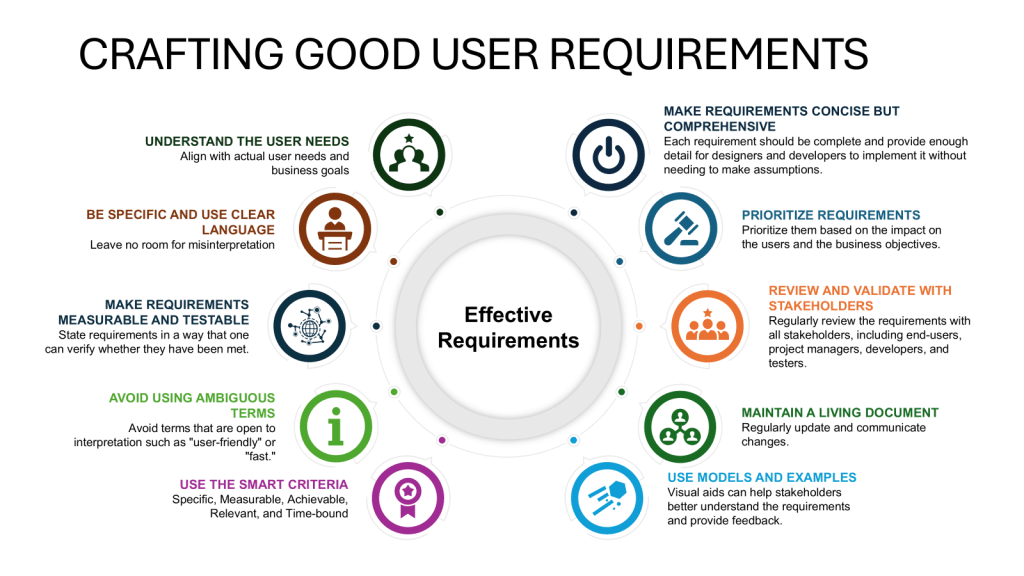
Ensure clear, objectively stated requirements that are verifiable during testing and commissioning.
Align the URS with company objectives and strategies to ensure long-term relevance and support.
Implement robust version control and change management processes for the URS throughout the validation lifecycle.
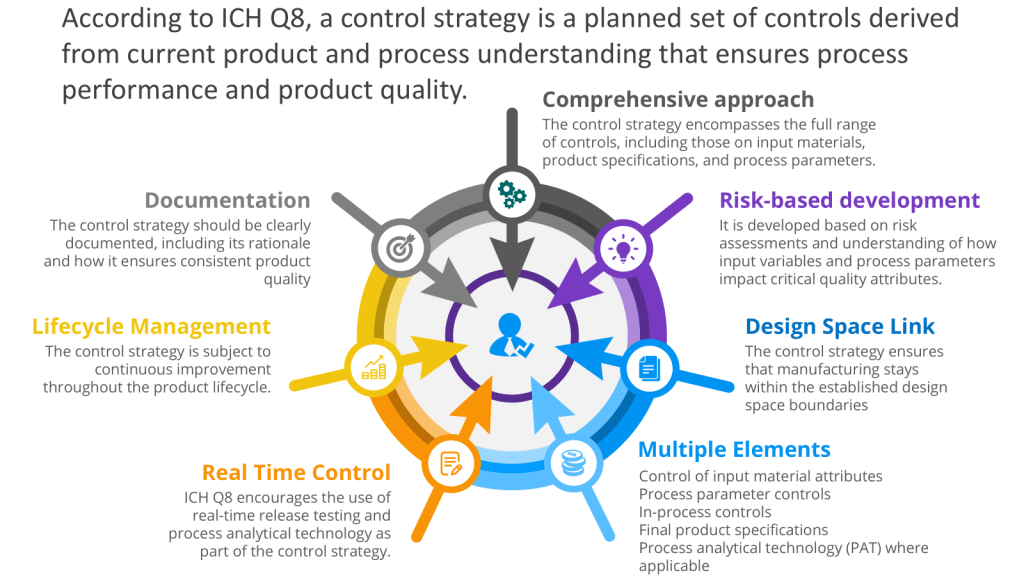
Executing the Control Space from the Design Space
The User Requirements Specification (URS) is a mechanism for executing the control space, from the design space as outlined in ICH Q8. To understand that, let’s discuss the path from a Quality Target Product Profile (QTPP) to Critical Quality Attributes (CQAs) to Critical Process Parameters (CPPs) with Proven Acceptable Ranges (PARs), which is a crucial journey in pharmaceutical development using Quality by Design (QbD) principles. This systematic approach ensures that the final product meets the desired quality standards and user needs.
It is important to remember that this is usually a set of user requirements specifications, respecting the system boundaries.
From QTPP to CQAs
The journey begins with defining the Quality Target Product Profile (QTPP). The QTPP is a comprehensive summary of the quality characteristics that a drug product should possess to ensure its safety, efficacy, and overall quality. It serves as the foundation for product development and includes considerations such as:
Dosage strength
Delivery system
Dosage form
Container system
Purity
Stability
Sterility
Once the QTPP is established, the next step is to identify the Critical Quality Attributes (CQAs). CQAs are physical, chemical, biological, or microbiological properties that should be within appropriate limits to ensure the desired product quality. These attributes are derived from the QTPP and are critical to the safety and efficacy of the product.
From CQAs to CPPs
With the CQAs identified, the focus shifts to determining the Critical Process Parameters (CPPs). CPPs are process variables that have a direct impact on the CQAs. These parameters must be monitored and controlled to ensure that the product consistently meets the desired quality standards. Examples of CPPs include:
Temperature
pH
Cooling rate
Rotation speed
The relationship between CQAs and CPPs is established through risk assessment, experimentation, and data analysis. This step often involves Design of Experiments (DoE) to understand how changes in CPPs affect the CQAs. This is Process Characterization.
Establishing PARs
For each CPP, a Proven Acceptable Range (PAR) is determined. The PAR represents the operating range within which the CPP can vary while still ensuring that the CQAs meet the required specifications. PARs are established through rigorous testing and validation processes, often utilizing statistical tools and models.
Build the Requirements for the CPPs
The CPPs with PARs are process parameters that can affect critical quality attributes of the product and must be controlled within predetermined ranges. These are translated into user requirements. Many will specifically label these as Product User Requirements (PUR) to denote they are linked to the overall product capability. This helps to guide risk assessments and develop an overall verification approach.
Most of Us End Up on the Less than Happy Path
This approach is the happy path that aligns nicely with the FDA’s Process Validation Model.
This can quickly break down in the real world. Most of us go into CDMOs with already qualified equipment. We have platforms on which we’ve qualified our equipment, too. We don’t know the CPPs until just before PPQ.
This makes the user requirements even more important as living documents. Yes, we’ve qualified our equipment for these large ranges. Now that we have the CPPs, we update the user requirements for the Product User Requirements, perform an overall assessment of the gaps, and, with a risk-based approach, do additional verification activations either before or as part of Process Performance Qualification (PPQ).
Maintaining process closure is crucial for ensuring product quality and safety in biotechnology manufacturing, especially when using single-use systems (SUS). This approach is an integral part of the contamination control strategy (CCS). To validate process closure in SUS-based biotech manufacturing, a comprehensive method is necessary, incorporating:
Risk assessment
Thorough testing
Ongoing monitoring
By employing risk analysis tools such as Hazard Analysis and Critical Control Points (HACCP) and Failure Mode and Effects Analysis (FMEA), manufacturers can identify potential weaknesses in their processes. Additionally, addressing all four layers of protection helps ensure process integrity and product safety. This risk-based approach to process closure validation is essential for maintaining the high standards required in biotechnology manufacturing, including meeting Annex 1.
Understanding Process Closure
Process closure refers to the isolation of the manufacturing process from the external environment to prevent contamination. In biotech, this is particularly crucial due to the sensitivity of biological products and the potential for microbial contamination.
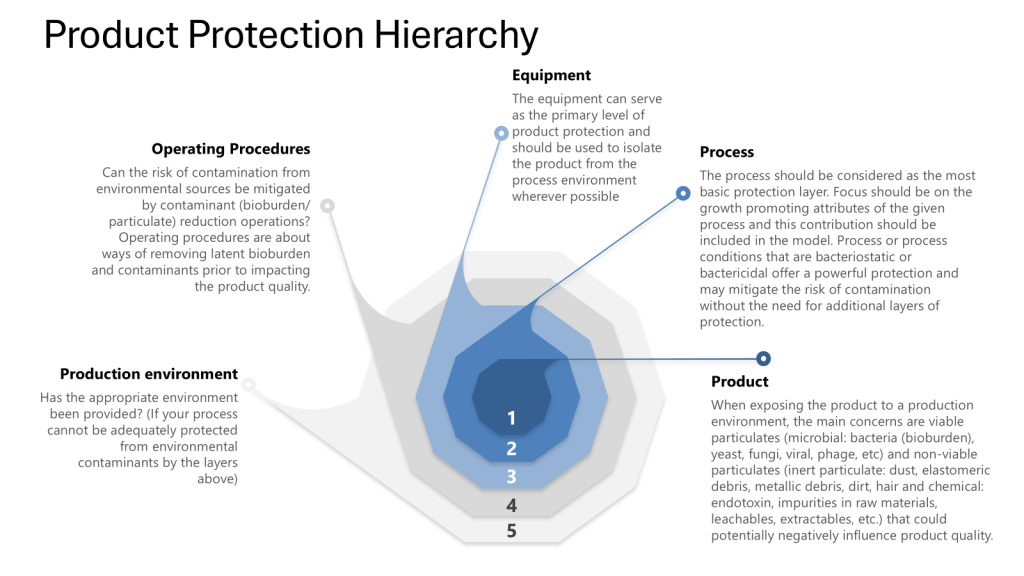
Throughout this process it is important to apply the four layers of protection that form the foundation of a robust contamination control strategy:
Process: The inherent ability of the process to prevent or control contamination
Equipment: The design and functionality of equipment to maintain closure
Operating Procedures: The practices and protocols followed by personnel
Production Environment: The controlled environment surrounding the process
I was discussing this with some colleagues this week (preparing for some risk assessments) and I was reminded that we really should put the Patient in at the center, the zero. Truer words have never been spoken as the patient truly is our zeroth law, the fundamental principle of the GxPs.
Key Steps for Validating Process Closure
Risk Assessment
Start with a comprehensive risk assessment using tools such as HACCP (Hazard Analysis and Critical Control Points) and FMEA (Failure Mode and Effects Analysis). It is important to remember this is not a one or another, but a multi-tiered approach where you first determine the hazards through the HACCP and then drill down into failures through an FMEA.
HACCP Approach
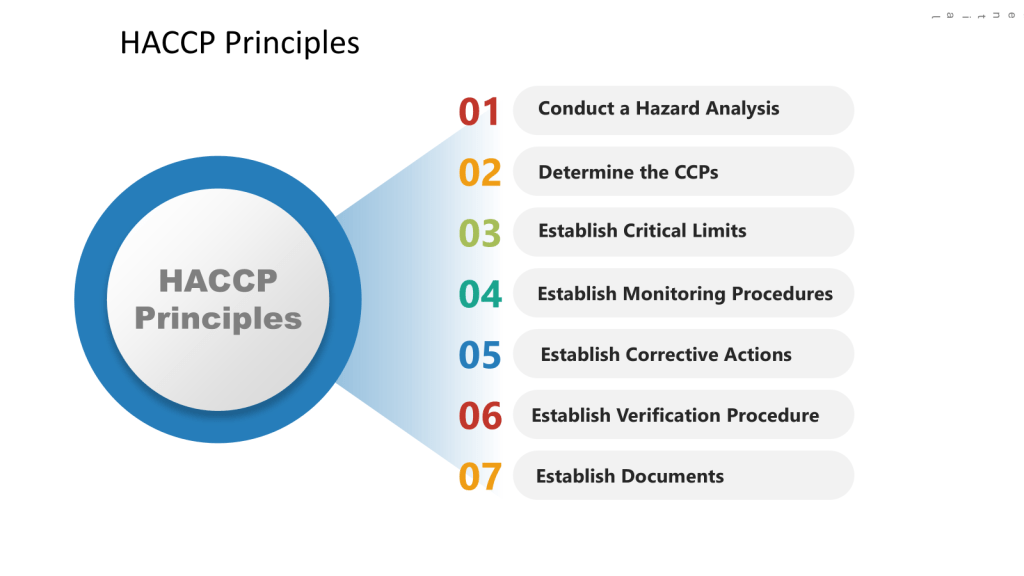
In the HACCP we will apply a systematic, preventative approach to identify hazards in the process with the aim to produce a documented plan to control these scenarios.
a) Conduct a hazard analysis b) Identify Critical Control Points (CCPs) c) Establish critical limits d) Implement monitoring procedures e) Define corrective actions f) Establish verification procedures g) Maintain documentation and records
FMEA Considerations
In the FMEA we will look for ways the process fails, focusing on the SUS components. We will evaluate failures at each level of control (process, equipment, operating procedure and environment).
Identify potential failure modes in the SUS components
Assess the severity, occurrence, and detectability of each failure mode
Calculate Risk Priority Numbers (RPN) to prioritize risks
Verification
Utilizing these risk assessments, define the user requirements specification (URS) for the SUS, focusing on critical aspects that could impact product quality and patient safety. This should include:
Process requirements (e.g. working volumes, flow rates, pressure ranges)
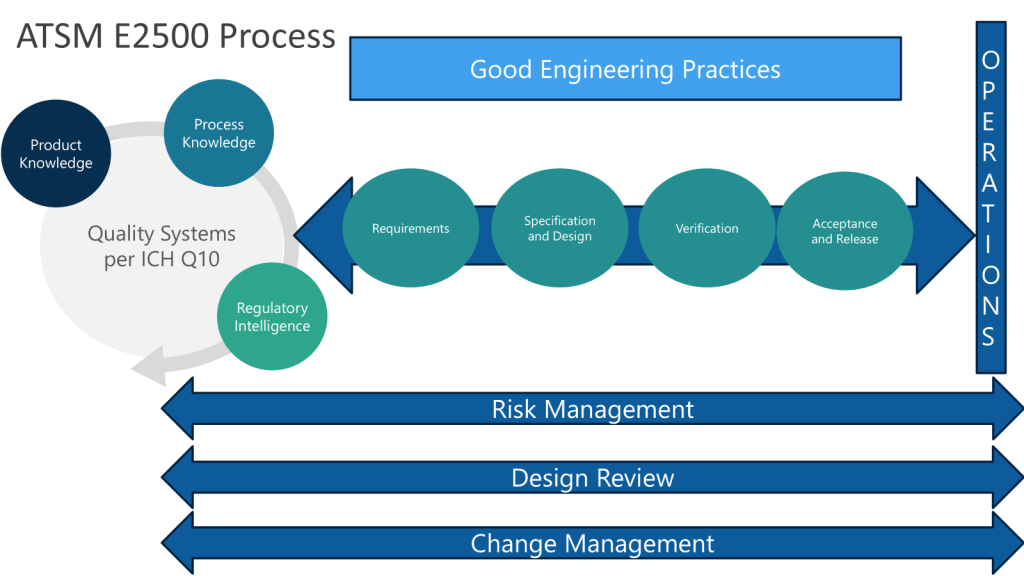
Following the ASTM E2500 approach, when we conduct the design review of the proposed SUS configuration, to evaluate how well it meets the URS, we want to ensure we cover:
Overall system design and component selection
Materials of construction
Sterilization/sanitization approach
Integrity assurance measures
Sampling and monitoring capabilities
Automation and control strategy
Circle back to the HACCP and FMEA to ensure they appropriately cover critical aspects like:
Loss of sterility/integrity
Leachables/extractables introduction
Bioburden control failures
Cross-contamination risks
Process parameter deviations
These risk assessments will define critical control parameters and acceptance criteria based on the risk assessment. These will form the basis for verification testing. We will through our verification plan have an appropriate approach to:
Verify proper installation of SUS components
Check integrity of connections and seals
Confirm correct placement of sensors and monitoring devices
Document as-built system configuration
Test system integrity under various operating conditions
Perform leak tests on connections and seals
Validate sterilization processes for SUS components
Verify functionality of critical sensors and control
Run simulated production cycles
Monitor for contamination using sensitive detection methods
Verify maintenance of sterility throughout the process
Assess product quality attributes
The verification strategy will leverage a variety of supplier documentation and internal testing.
Closure Analysis Risk Assessment (CLARA)
Acceptance and release will be to perform a detailed CLARA to:
Identify all potential points of contamination ingress
Assess the effectiveness of closure mechanisms
Evaluate the robustness of aseptic connections
Determine the impact of manual interventions on system closure
On Going Use
Coming out of our HACCP we will have a monitoring and verification plan, this will include some important aspects based on our CCPs.
Integrity Testing
Implement routine integrity testing protocols for SUS components
Utilize methods such as pressure decay tests or helium leak detection
Establish acceptance criteria for integrity tests
Environmental Monitoring
Develop a comprehensive environmental monitoring program
Include viable and non-viable particle monitoring
Establish alert and action limits for environmental contaminants
Establish a robust change control process for any modifications to the SUS or process
Regularly review and update risk assessments based on new data or changes
Implement a continuous improvement program to enhance process closure
Leveraging the Four Layers of Protection
Throughout the validation process, ensure that each layer of protection is addressed:
Process:
Optimize process parameters to minimize contamination risks
Implement in-process controls to detect deviations
Equipment:
Validate the design and functionality of SUS components
Ensure proper integration of SUS with existing equipment
Operating Procedures:
Develop and validate aseptic techniques for SUS handling
Implement procedures for system assembly and disassembly
Production Environment:
Qualify the cleanroom environment
Validate HVAC systems and air filtration
Remember that validation is an ongoing process. Regular reviews, updates to risk assessments, and incorporation of new technologies and best practices are essential for maintaining a state of control in biotech manufacturing using single-use systems.
Connected to the Contamination Control Strategy
Closed systems are a key element of the overall contamination control strategy with closed processing and closed systems now accepted as the most effective contamination control risk mitigation strategy. I might not be able to manufacture in the woods yet, but darn if I won’t keep trying.
They serve as a primary barrier to prevent contamination from the manufacturing environment by helping to mitigate the risk of contamination by isolating the product from the surrounding environment. Closed systems are the key protective measure to prevent contamination from the manufacturing environment and cross-contamination from neighboring operations.
The risk assessments leveraged during the implementation of closed systems are a crucial part of developing an effective CCS and will communicate the (ideally) robust methods used to protect products from environmental contamination and cross-contamination. This is tied into the facility design, environmental controls, risk assessments, and overall manufacturing strategies, which are the key components of a comprehensive CCS.
Track the time taken to approve validation documents
Supplier Performance
Monitor supplier audit results related to validated systems or components
Track supplier-related deviations or non-conformances
Regulatory Inspection Outcomes
Track the number and severity of validation-related observations during inspections
Measure the time taken to address and close out regulatory findings
Cost and Efficiency Metrics
Measure the time and resources required to complete validation activities
Track cost savings achieved through optimized CQV approaches
By tracking these metrics, we might be able to demonstrate a comprehensive and effective CQV program that aligns with regulatory expectations. Or we might just spend time measuring stuff that may not be tailored to our individual company’s processes, products, and risk profile. And quite frankly, will they influence the system the way we want? It’s time to pull out an IMPACT key behavior analysis to help us tailor a right-sized set of metrics.
The first thing to do is to go to first principles, to take a big step back and ask – what do I really want to improve?
The purpose of a CQV program is to provide documented evidence that facilities, systems, equipment and processes have been designed, installed and operate in accordance with predetermined specifications and quality attributes:
To verify that critical aspects of a facility, utility system, equipment or process meet approved design specifications and quality attributes.
To demonstrate that processes, equipment and systems are fit for their intended use and perform as expected to consistently produce a product meeting its quality attributes.
To establish confidence that the manufacturing process is capable of consistently delivering quality product.
To identify and understand sources of variability in the process to better control it.
To detect potential problems early in development and prevent issues during routine production.
The ultimate measure of success is demonstrating and maintaining a validated state that ensures consistent production of safe and effective products meeting all quality requirements.
Focusing on the Impact is important. What are we truly concerned about for our CQV program. Based on that we come up with two main factors:
The level of deviations that stem from root causes associated with our CQV program
The readiness of FUSE elements for use (project adherence)
Reducing Deviations from CQV Activities
First, we gather data, what deviations are we looking for? These are the types of root causes that we will evaluate. Of course, your use of the 7Ms may vary, this list is to start conversation.
Means
Automation or Interface Design Inadequate/Defective
Validated machine or computer system interface or automation failed to meet specification due to inadequate/defective design.
Means
Preventative Maintenance Inadequate
The preventive maintenance performed on the equipment was insufficient or not performed as required.
Means
Preventative Maintenance Not Defined
No preventive maintenance is defined for the equipment used.
Means
Equipment Defective/Damaged/Failure
The equipment used was defective or a specific component failed to operate as intended.
Means
Equipment Incorrect
Equipment required for the task was set up or used incorrectly or the wrong equipment was used for the task.
Means
Equipment Design Inadequate/Defective
The equipment was not designed or qualified to perform the task required or the equipment was defective, which prevented its normal operation.
Media
Facility Design
Improper or inadequate layout or construction of facility, area, or work station.
Methods
Calibration Frequency is Not Sufficient/Deficiency
Calibration interval is too long and/or calibration schedule is lacking.
Methods
Calibration/Validation Problem
An error occurred because of a data collection- related issue regarding calibration or validation.
Methods
System / Process Not Defined
The system/tool or the defined process to perform the task does not exist.
Based on analysis of what is going on we can move into using a why-why technique to look at our layers.
Why 1
Why are deviations stemming from CQV events not at 0% Because unexpected issues or discrepancies arise after the commissioning, qualification, or validation processes
Success factor needed for this step: Effectiveness of the CQV program
Metric for this step: Adherence to CQV requirements
Why 2 (a)
Why are unexpected issues arising after CQV? Because of inadequate planning and resource constraints in the CQV process.
Success Factor needed for this step: Appropriate project and resource planning
Metric for this Step: Resource allocation
Why 3 (a)
Why are we not performing adequate resource planning? Because of the tight project timelines, and the involvement of multiple stakeholders with different areas of expertise
Success Factor needed for this step: Cross-functional governance to implement risk methodologies to focus efforts on critical areas
Metric for this Step: Risk Coverage Ratio measuring the percentage of identified critical risks that have been properly assessed and and mitigated through the cross-functional risk management process. This metric helps evaluate how effectively the governance structure is addressing the most important risks facing the organization.
Why 2 (b)
Why are unexpected issues arising after CQV? Because of poorly executed elements of the CQV process stemming from poorly written procedures and under-qualified staff.
Success Factor needed for this step: Process Improvements and Training Qualification
Metric for this Step: Performance to Maturity Plan
There were somethings I definitely glossed over there, and forgive me for not providing numbers there, but I think you get the gist.
So now I’ve identified the I – How do we improve reliability of our CQV program, measured by reducing deviations. Let’s break out the rest.
Parameters
Executed for CQV
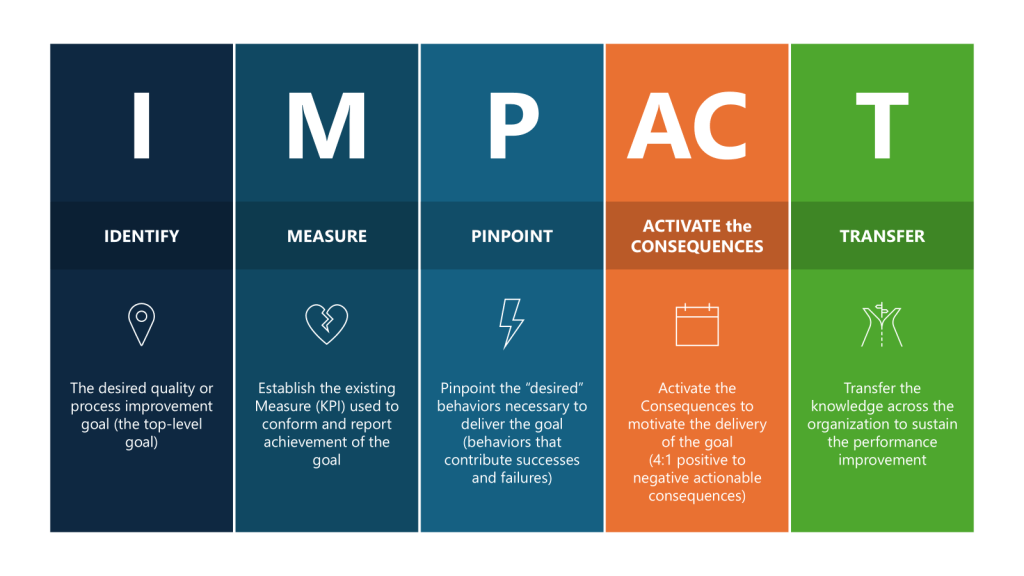
IDENTIFY
The desired quality or process improvement goal (the top-level goal)
Improve the effectiveness of the CQV program by taking actions to reduce deviations stemming from verification of FUSE and process.
MEASURE
Establish the existing Measure (KPI) used to conform and report achievement of the goal
Set a target reduction of deviations related to CQV activities.
Pinpoint
Pinpoint the “desired” behaviors necessary to deliver the goal (behaviors that contribute successes and failures)
Drive good project planning and project adherence.
Promote and coach for enhanced attention to detail where “quality is everyone’s job.”
Encourage a speak-up culture where concerns, issues or suggestions are shared in a timely manner in a neutral constructive forum.
ACTIVATE the CONSEQUENCES
Activate the Consequences to motivate the delivery of the goal (4:1 positive to negative actionable consequences)
Organize team briefings on consequences
Review outcomes of project health
Senior leadership celebrate/acknowledge
Acknowledge and recognize improvements
Motivate the team through team awards
Measure success on individual deliverables through a Rubric
TRANSFER
Transfer the knowledge across the organization to sustain the performance improvement
Create learning teams
Lessons learned are documented and shared
Lunch-and-learn sessions
Create improvement case studies
From these two exercises I’ve now identified my lagging and leading indicators at the KPI and the KBI level.
ASTM E2500 recognizes that Good Engineering Practices (GEP) are essential for pharmaceutical companies to ensure the consistent and reliable design, delivery, and operation of engineered systems in a manner suitable for their intended purpose.
Key Elements of Good Engineering Practices
Risk Management: Applying systematic processes to identify, assess, and control risks throughout the lifecycle of engineered systems. This includes quality risk management focused on product quality and patient safety.
Cost Management: Estimating, budgeting, monitoring and controlling costs for engineering projects and operations. This helps ensure projects deliver value and stay within budget constraints.
Organization and Control: Establishing clear organizational structures, roles and responsibilities for engineering activities. Implementing monitoring and control mechanisms to track performance.
Innovation and Continual Improvement: Fostering a culture of innovation and continuous improvement in engineering processes and systems.
Lifecycle Management: Applying consistent processes for change management, issue management, and document control throughout a system’s lifecycle from design to decommissioning.
Project Management: Following structured approaches for planning, executing and controlling engineering projects.
Design Practices: Applying systematic processes for requirements definition, design development, review and qualification.
Operational Support: Implementing asset management, calibration, maintenance and other practices to support systems during routine operations.
Key Steps for Implementation
Develop and document GEP policies, procedures and standards tailored to the company’s needs
Establish an Engineering Quality Process (EQP) to link GEP to the overall Pharmaceutical Quality System
Provide training on GEP principles and procedures to engineering staff
Implement risk-based approaches to focus efforts on critical systems and processes
Use structured project management methodologies for capital projects
Apply change control and issue management processes consistently
Maintain engineering documentation systems with appropriate controls
Conduct periodic audits and reviews of GEP implementation
Foster a culture of quality and continuous improvement in engineering
Ensure appropriate interfaces between engineering and quality/regulatory functions
The key is to develop a systematic, risk-based approach to GEP that is appropriate for the company’s size, products and operations. When properly implemented, GEP provides a foundation for regulatory compliance, operational efficiency and product quality in pharmaceutical manufacturing.
Invest in a Living, Breathing Engineering Quality Process (EQP)
The EQP establishes the formal connection between GEP and the Pharmaceutical Quality System it resides within, serving as the boundary between Quality oversight and engineering activities, particularly for implementing Quality Risk Management (QRM) based integrated Commissioning and Qualification (C&Q).
It should also provide an interface between engineering activities and other systems like business operations, health/safety/environment, or other site quality systems.
Based on the information provided in the document, here is a suggested table of contents for an Engineering Quality Process (EQP):
Table of Contents – Engineering Quality Process (EQP)
Application and Context 2.1 Relationship to Pharmaceutical Quality System (PQS) 2.2 Relationship to Good Engineering Practice (GEP) 2.3 Interface with Quality Risk Management (QRM)
EQP Elements 3.1 Policies and Procedures for the Asset Lifecycle and GEPs 3.2 Risk Assessment 3.3 Change Management 3.4 Document Control 3.5 Training 3.6 Auditing
Deliverables 4.1 GEP Documentation 4.2 Risk Assessments 4.3 Change Records 4.4 Training Records 4.5 Audit Reports
Roles and Responsibilities 5.1 Engineering 5.2 Quality 5.3 Operations 5.4 Other Stakeholders
EQP Implementation 6.1 Establishing the EQP 6.2 Maintaining the EQP 6.3 Continuous Improvement