How you respond in the first 24 hours after discovering a deviation can make the difference between a minor quality issue and a major compliance problem. This critical window-what I call “The Golden Day”-represents your best opportunity to capture accurate information, contain potential risks, and set the stage for a successful investigation. When managed effectively, this initial day creates the foundation for identifying true root causes and implementing effective corrective actions that protect product quality and patient safety.
Why the First 24 Hours Matter: The Evidence
The initial response to a deviation is crucial for both regulatory compliance and effective problem-solving. Industry practice and regulatory expectations align on the importance of quick, systematic responses to deviations.
- Regulatory expectations explicitly state that deviation investigation and root cause determination should be completed in a timely manner, and industry expectations usually align on deviations being completed within 30 days of discovery.
- In the landmark U.S. v. Barr Laboratories case, “the Court declared that all failure investigations must be performed promptly, within thirty business days of the problem’s occurrence”
- Best practices recommend assembling a cross-functional team immediately after deviation discovery and conduct initial risk assessment within 24 hours”
- Initial actions taken in the first day directly impact the quality and effectiveness of the entire investigation process
When you capitalize on this golden window, you’re working with fresh memories, intact evidence, and the highest chance of observing actual conditions that contributed to the deviation.
Identifying the Problem: Clarity from the Start
Clear, precise problem definition forms the foundation of any effective investigation. Vague or incomplete problem statements lead to misdirected investigations and ultimately, inadequate corrective actions.
- Document using specific, factual language that describes what occurred versus what was expected
- Include all relevant details such as procedure and equipment numbers, product names and lot numbers
- Apply the 5W2H method (What, When, Where, Who, Why if known, How much is involved, and How it was discovered)
- Avoid speculation about causes in the initial description
- Remember that the description should incorporate relevant records and photographs of discovered defects.
| 5W2H | Typical questions | Contains |
| Who? | Who are the people directly concerned with the problem? Who does this? Who should be involved but wasn’t? Was someone involved who shouldn’t be? | User IDs, Roles and Departments |
| What? | What happened? | Action, steps, description |
| When? | When did the problem occur? | Times, dates, place In process |
| Where? | Where did the problem occur? | Location |
| Why is it important? | Why did we do this? What are the requirements? What is the expected condition? | Justification, reason |
| How? | How did we discover. Where in the process was it? | Method, process, procedure |
| How Many? How Much? | How many things are involved? How often did the situation happen? How much did it impact? | Number, frequency |
The quality of your deviation documentation begins with this initial identification. As I’ve emphasized in previous posts, the investigation/deviation report should tell a story that can be easily understood by all parties well after the event and the investigation. This narrative begins with clear identification on day one.
| Elements | Problem Statement |
| Is used to… | Understand and target a problem. Providing a scope. Evaluate any risks. Make objective decisions |
| Answers the following… (5W2H) | What? (problem that occurred);When? (timing of what occurred); Where? (location of what occurred); Who? (persons involved/observers); Why? (why it matters, not why it occurred); How Much/Many? (volume or count); How Often? (First/only occurrence or multiple) |
| Contains… | Object (What was affected?); Defect (What went wrong?) |
| Provides direction for… | Escalation(s); Investigation |

Going to the GEMBA: Being Where the Action Is
GEMBA-the actual place where work happens-is a cornerstone concept in quality management. When a deviation occurs, there is no substitute for being physically present at the location.
- Observe the actual conditions and environment firsthand
- Notice details that might not be captured in written reports
- Understand the workflow and context surrounding the deviation
- Gather physical evidence before it’s lost or conditions change
- Create the opportunity for meaningful conversations with operators
Human error occurs because we are human beings. The extent of our knowledge, training, and skill has little to do with the mistakes we make. We tire, our minds wander and lose concentration, and we must navigate complex processes while satisfying competing goals and priorities – compliance, schedule adherence, efficiency, etc.
Foremost to understanding human performance is knowing that people do what makes sense to them given the available cues, tools, and focus of their attention at the time. Simply put, people come to work to do a good job – if it made sense for them to do what they did, it will make sense to others given similar conditions. The following factors significantly shape human performance and should be the focus of any human error investigation:
| Physical Environment Environment, tools, procedures, process design | Organizational Culture Just- or blame-culture, attitude towards error |
| Management and Supervision Management of personnel, training, procedures | Stress Factors Personal, circumstantial, organizational |
We do not want to see or experience human error – but when we do, it’s imperative to view it as a valuable opportunity to improve the system or process. This mindset is the heart of effective human error prevention.
Conducting an Effective GEMBA Walk for Deviations
When conducting your GEMBA walk specifically for deviation investigation:
- Arrive with a clear purpose and structured approach
- Observe before asking questions
- Document observations with photos when appropriate
- Look for environmental factors that might not appear in reports
- Pay attention to equipment configuration and conditions
- Note how operators interact with the process or equipment
A deviation gemba is a cross-functional team meeting that is assembled where a potential deviation event occurred. Going to the gemba and “freezing the scene” as close as possible to the time the event occurred will yield valuable clues about the environment that existed at the time – and fresher memories will provide higher quality interviews. This gemba has specific objectives:
- Obtain a common understanding of the event: what happened, when and where it happened, who observed it, who was involved – all the facts surrounding the event. Is it a deviation?
- Clearly describe actions taken, or that need to be taken, to contain impact from the event: product quarantine, physical or mechanical interventions, management or regulatory notifications, etc.
- Interview involved operators: ask open-ended questions, like how the event unfolded or was discovered, from their perspective, or how the event could have been prevented, in their opinion – insights from personnel experienced with the process can prove invaluable during an investigation.
Deviation GEMBA Tips
Typically there is time between when notification of a deviation gemba goes out and when the team is scheduled to assemble. It is important to come prepared to help facilitate an efficient gemba:
- Assemble procedures and other relevant documents and records. This will make references easier during the gemba.
- Keep your team on-track – the gemba should end with the team having a common understanding of the event, actions taken to contain impact, and the agreed-upon next steps of the investigation.
You will gain plenty of investigational leads from your observations and interviews at the gemba – which documents to review, which personnel to interview, which equipment history to inspect, and more. The gemba is such an invaluable experience that, for many minor events, root cause and CAPA can be determined fairly easily from information gathered solely at the gemba.
Informal Rubric for Conducting a Good Deviation GEMBA
- Describe the timeliness of the team gathering at the gemba.
- Were all required roles and experts present?
- Was someone leading or facilitating the gemba?
- Describe any interviews the team performed during the gemba.
- Did the team get sidetracked or off-topic during the gemba
- Was the team prepared with relevant documentation or information?
- Did the team determine batch impact and any reportability requirements?
- Did the team satisfy the objectives of the gemba?
- What did the team do well?
- What could the team improve upon?
Speaking with Operators: The Power of Cognitive Interviewing
Interviewing personnel who were present when the deviation occurred requires special techniques to elicit accurate, complete information. Traditional questioning often fails to capture critical details.
Cognitive interviewing, as I outlined in my previous post on “Interviewing,” was originally created for law enforcement and later adopted during accident investigations by the National Transportation Safety Board (NTSB). This approach is based on two key principles:
- Witnesses need time and encouragement to recall information
- Retrieval cues enhance memory recall

How to Apply Cognitive Interviewing in Deviation Investigations
- Mental Reinstatement: Encourage the interviewee to mentally recreate the environment and people involved
- In-Depth Reporting: Encourage the reporting of all the details, even if it is minor or not directly related
- Multiple Perspectives: Ask the interviewee to recall the event from others’ points of view
- Several Orders: Ask the interviewee to recount the timeline in different ways. Beginning to end, end to beginning
Most importantly, conduct these interviews at the actual location where the deviation occurred. A key part of this is that retrieval cues access memory. This is why doing the interview on the scene (or Gemba) is so effective.
| Component | What It Consists of |
| Mental Reinstatement | Encourage the interviewee to mentally recreate the environment and people involved. |
| In-Depth Reporting | Encourage the reporting of all the details. |
| Multiple Perspectives | Ask the interviewee to recall the event from others’ points of view. |
| Several Orders | Ask the interviewee to recount the timeline in different ways. |
- Approach the Interviewee Positively:
- Ask for the interview.
- State the purpose of the interview.
- Tell interviewee why he/she was selected.
- Avoid statements that imply blame.
- Focus on the need to capture knowledge
- Answer questions about the interview.
- Acknowledge and respond to concerns.
- Manage negative emotions.
- Apply these Four Components:
- Use mental reinstatement.
- Report everything.
- Change the perspective.
- Change the order.
- Apply these Two Principles:
- Witnesses need time and encouragement to recall information.
- Retrieval cues enhance memory recall.
- Demonstrate these Skills:
- Recreate the original context and had them walk you through process.
- Tell the witness to actively generate information.
- Adopt the witness’s perspective.
- Listen actively, do not interrupt, and pause before asking follow-up questions.
- Ask open-ended questions.
- Encourage the witness to use imagery.
- Perform interview at the Gemba.
- Follow sequence of the four major components.
- Bring support materials.
- Establish a connection with the witness.
- Do Not tell them how they made the mistake.
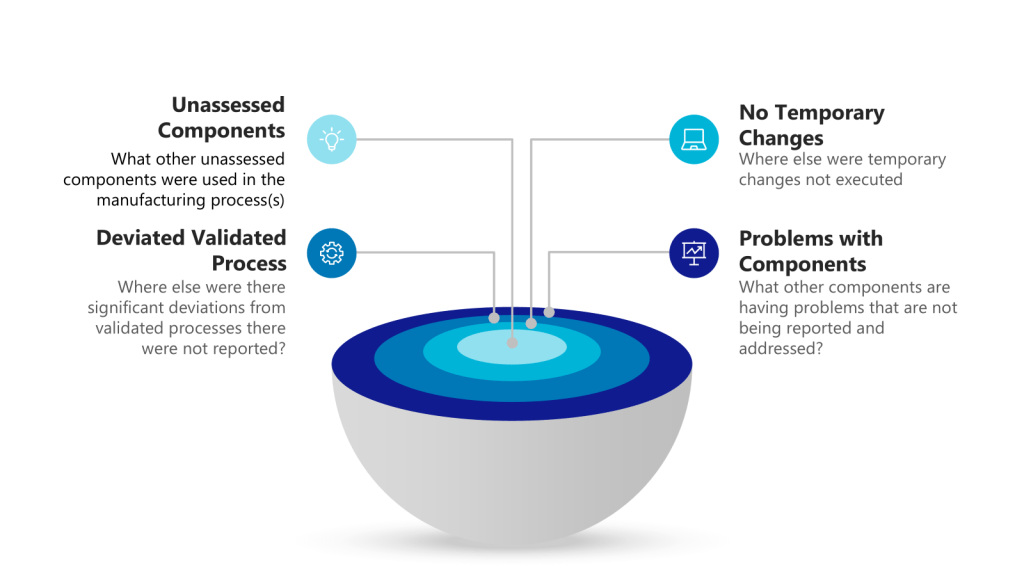
Initial Impact Assessment: Understanding the Scope
Within the first 24 hours, a preliminary impact assessment is essential for determining the scope of the deviation and the appropriate response.
- Apply a risk-based approach to categorize the deviation as critical, major, or minor
- Evaluate all potentially affected products, materials, or batches
- Consider potential effects on critical quality attributes
- Assess possible regulatory implications
- Determine if released products may be affected
This impact assessment is also the initial risk assessment, which will help guide the level of effort put into the deviation.
Factors to Consider in Initial Risk Assessment
- Patient safety implications
- Product quality impact
- Compliance with registered specifications
- Potential for impact on other batches or products
- Regulatory reporting requirements
- Level of investigation required
This initial assessment will guide subsequent decisions about quarantine, notification requirements, and the depth of investigation needed. Remember, this is a preliminary assessment that will be refined as the investigation progresses.
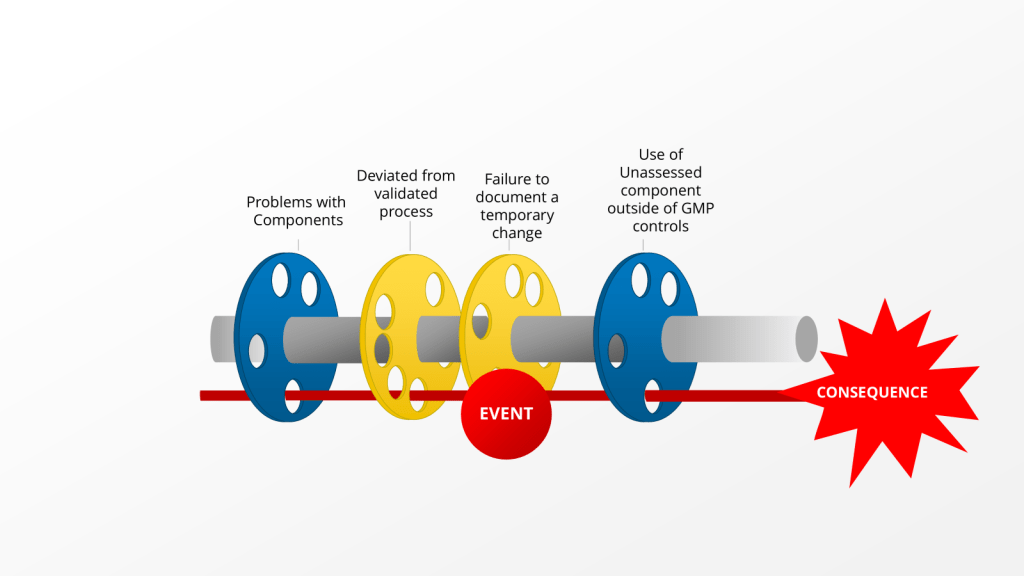
Immediate Actions: Containing the Issue
Once you’ve identified the deviation and assessed its potential impact, immediate actions must be taken to contain the issue and prevent further risk.
- Quarantine potentially affected products or materials to prevent their release or further use
- Notify key stakeholders, including quality assurance, production supervision, and relevant department heads
- Implement temporary corrective or containment measures
- Document the deviation in your quality management system
- Secure relevant evidence and documentation
- Consider whether to stop related processes
Industry best practices emphasize that you should Report the deviation in real-time. Notify QA within 24 hours and hold the GEMBA. Remember that “if you don’t document it, it didn’t happen” – thorough documentation of both the deviation and your immediate response is essential.
Affected vs Related Batches
Not every Impact is the same, so it can be helpful to have two concepts: Affected and Related.
- Affected Batch: Product directly impacted by the event at the time of discovery, for instance, the batch being manufactured or tested when the deviation occurred.
- Related Batch: Product manufactured or tested under the same conditions or parameters using the process in which the deviation occurred and determined as part of the deviation investigation process to have no impact on product quality.
Setting Up for a Successful Full Investigation
The final step in the golden day is establishing the foundation for the comprehensive investigation that will follow.
- Assemble a cross-functional investigation team with relevant expertise
- Define clear roles and responsibilities for team members
- Establish a timeline for the investigation (remembering the 30-day guideline)
- Identify additional data or evidence that needs to be collected
- Plan for any necessary testing or analysis
- Schedule follow-up interviews or observations
In my post on handling deviations, I emphasized that you must perform a time-sensitive and thorough investigation within 30 days. The groundwork laid during the golden day will make this timeline achievable while maintaining investigation quality.
Planning for Root Cause Analysis
During this setup phase, you should also begin planning which root cause analysis tools might be most appropriate for your investigation. Select tools based on the event complexity and the number of potential root causes and when “human error” appears to be involved, prepare to dig deeper as this is rarely the true root cause
Identifying Phase of your Investigation
| If | Then you are at |
| The problem is not understood. Boundaries have not been set. There could be more than one problem | Problem Understanding |
| Data needs to be collected. There are questions about frequency or occurrence. You have not had interviews | Data Collection |
| Data has been collected but not analyszed | Data Analysis |
| The root cause needs to be determined from the analyzed data | Identify Root Cause |
Root Cause Analysis Tools Chart
| Purpose | Tool | Description |
|---|---|---|
| Problem Understanding | Process Map | A picture of the separate steps of a process in sequential order, including:
|
| Critical Incident Technique (CIT) | A process used for collecting direct observations of human behavior that
|
|
| Comparative Analysis | A technique that focuses a problem-solving team on a problem. It compares one or more elements of a problem or process to evaluate elements that are similar or different (e.g. comparing a standard process to a failing process). | |
| Performance Matrix | A tool that describes the participation by various roles in completing tasks or deliverables for a project or business process. Note: It is especially useful in clarifying roles and responsibilities in cross-functional/departmental positions. |
|
| 5W2H Analysis | An approach that defines a problem and its underlying contributing factors by systematically asking questions related to who, what, when, where, why, how, and how much/often. | |
| Data Collection | Surveys | A technique for gathering data from a targeted audience based on a standard set of criteria. |
| Check Sheets | A technique to compile data or observations to detect and show trends/patterns. | |
| Cognitive Interview | An interview technique used by investigators to help the interviewee recall specific memories from a specific event. | |
| KNOT Chart | A data collection and classification tool to organize data based on what is
|
|
| Data Analysis | Pareto Chart | A technique that focuses efforts on problems offering the greatest potential for improvement. |
| Histogram | A tool that
|
|
| Scatter Chart | A tool to study possible relationships between changes in two different sets of variables. | |
| Run Chart | A tool that captures study data for trends/patterns over time. | |
| Affinity Diagram | A technique for brainstorming and summarizing ideas into natural groupings to understand a problem. | |
| Root Cause Analysis | Interrelationship Digraphs | A tool to identify, analyze, and classify cause and effect relationships among issues so that drivers become part of an effective solution. |
| Why-Why | A technique that allows one to explore the cause-and-effect relationships of a particular problem by asking why; drilling down through the underlying contributing causes to identify root cause. | |
| Is/Is Not | A technique that guides the search for causes of a problem by isolating the who, what, when, where, and how of an event. It narrows the investigation to factors that have an impact and eliminates factors that do not have an impact. By comparing what the problem is with what the problem is not, we can see what is distinctive about a problem which leads to possible causes. | |
| Structured Brainstorming | A technique to identify, explore, and display the
|
|
| Cause and Effect Diagram (Ishikawa/Fishbone) | A tool to display potential causes of an event based on root cause categories defined by structured brainstorming using this tool as a visual aid. | |
| Causal Factor Charting | A tool to
|
|
| Other Tools | Prioritization Matrix | A tool to systematically compare choices through applying and weighting criteria. |
| Control Chart | A tool to monitor process performance over time by studying its variation and source. | |
| Process Capability | A tool to determine whether a process is capable of meeting requirements or specifications. |
Making the Most of Your Golden Day
The first 24 hours after discovering a deviation represent a unique opportunity that should not be wasted. By following the structured approach outlined in this post-identifying the problem clearly, going to the GEMBA, interviewing operators using cognitive techniques, conducting an initial impact assessment, taking immediate containment actions, and setting up for the full investigation-you maximize the value of this golden day.
Remember that excellent deviation management is directly linked to product quality, patient safety, and regulatory compliance. Each well-managed deviation is an opportunity to strengthen your quality system.
I encourage you to assess your current approach to the first 24 hours of deviation management. Are you capturing the full value of this golden day, or are you letting critical information slip away? Implement these strategies, train your team on proper deviation triage, and transform your deviation response from reactive to proactive.
Your deviation management effectiveness doesn’t begin when the investigation report is initiated-it begins the moment a deviation is discovered. Make that golden day count.