Determining Causative Laboratory Error in Bioburden, Endotoxin, and Environmental Monitoring OOS Results

In the previous post, we discussed the critical importance of thorough investigations into deviations, as highlighted by the recent FDA warning letter to Sanofi. Let us delve deeper into a specific aspect of these investigations: determining whether an invalidated out-of-specification (OOS) result for bioburden, endotoxin, or environmental monitoring action limit excursions conclusively demonstrates causative laboratory error.

When faced with an OOS result in microbiological testing, it’s crucial to conduct a thorough investigation before invalidating the result. The FDA expects companies to provide scientific justification and evidence that conclusively demonstrates a causative laboratory error if a result is to be invalidated.

Key Steps in Evaluating Laboratory Error

1. Review of Test Method and Procedure

  • Examine the standard operating procedure (SOP) for the test method
  • Verify that all steps were followed correctly
  • Check for any deviations from the established procedure

2. Evaluation of Equipment and Materials

Evaluation of Equipment and Materials is a critical step in determining whether laboratory error caused an out-of-specification (OOS) result, particularly for bioburden, endotoxin, or environmental monitoring tests. Here’s a detailed approach to performing this evaluation:

Equipment Assessment

Functionality Check
  • Run performance verification tests on key equipment used in the analysis
  • Review equipment logs for any recent malfunctions or irregularities
  • Verify that all equipment settings were correct for the specific test performed
Calibration Review
  • Check calibration records to ensure equipment was within its calibration period
  • Verify that calibration standards used were traceable and not expired
  • Review any recent calibration data for trends or shifts
Maintenance Evaluation
  • Examine maintenance logs for adherence to scheduled maintenance
  • Look for any recent repairs or adjustments that could affect performance
  • Verify that all preventive maintenance tasks were completed as required

Materials Evaluation

Reagent Quality Control
  • Check expiration dates of all reagents used in the test
  • Review storage conditions to ensure reagents were stored properly
  • Verify that quality control checks were performed on reagents before use
Media Assessment (for Bioburden and Environmental Monitoring)
  • Review growth promotion test results for culture media
  • Check pH and sterility of prepared media
  • Verify that media was stored at the correct temperature
Water Quality (for Endotoxin Testing)
  • Review records of water quality used for reagent preparation
  • Check for any recent changes in water purification systems
  • Verify endotoxin levels in water used for testing

Environmental Factors

Laboratory Conditions
  • Review temperature and humidity logs for the testing area
  • Check for any unusual events (e.g., power outages, HVAC issues) around the time of testing
  • Verify that environmental conditions met the requirements for the test method
Contamination Control
  • Examine cleaning logs for the laboratory area and equipment
  • Review recent environmental monitoring results for the testing area
  • Check for any breaches in aseptic technique during testing

Documentation Review

Standard Operating Procedures (SOPs)
  • Verify that the most current version of the SOP was used
  • Check for any recent changes to the SOP that might affect the test
  • Ensure all steps in the SOP were followed and documented
Equipment and Material Certifications
  • Review certificates of analysis for critical reagents and standards
  • Check equipment qualification documents (IQ/OQ/PQ) for compliance
  • Verify that all required certifications were current at the time of testing

By thoroughly evaluating equipment and materials using these detailed steps, laboratories can more conclusively determine whether an OOS result was due to laboratory error or represents a true product quality issue. This comprehensive approach helps ensure the integrity of microbiological testing and supports robust quality control in pharmaceutical manufacturing.

3. Assessment of Analyst Performance

Here are key aspects to consider when evaluating analyst performance during an OOS investigation:

Review Training Records

  • Examine the analyst’s training documentation to ensure they are qualified to perform the specific test method.
  • Verify that the analyst has completed all required periodic refresher training.
  • Check if the analyst has demonstrated proficiency in the particular test method recently.

Evaluate Recent Performance History

  • Review the analyst’s performance on similar tests over the past few months.
  • Look for any patterns or trends in the analyst’s results, such as consistently high or low readings.
  • Compare the analyst’s results with those of other analysts performing the same tests.

Conduct Interviews

  • Interview the analyst who performed the test to gather detailed information about the testing process.
  • Ask open-ended questions to encourage the analyst to describe any unusual occurrences or deviations from standard procedures.
  • Inquire about the analyst’s workload and any potential distractions during testing.

Observe Technique

  • If possible, have the analyst demonstrate the test method while being observed by a supervisor or senior analyst.
  • Pay attention to the analyst’s technique, including sample handling, reagent preparation, and equipment operation.
  • Note any deviations from standard operating procedures (SOPs) or good practices.

Review Documentation Practices

  • Examine the analyst’s laboratory notebooks and test records for completeness and accuracy.
  • Verify that all required information was recorded contemporaneously.
  • Check for any unusual notations or corrections in the documentation.

Assess Knowledge of Method and Equipment

  • Quiz the analyst on critical aspects of the test method and equipment operation.
  • Verify their understanding of acceptance criteria, potential sources of error, and troubleshooting procedures.
  • Ensure the analyst is aware of recent changes to SOPs or equipment calibration requirements.

Evaluate Workload and Environment

  • Consider the analyst’s workload at the time of testing, including any time pressures or competing priorities.
  • Assess the laboratory environment for potential distractions or interruptions that could have affected performance.
  • Review any recent changes in the analyst’s responsibilities or work schedule.

Perform Comparative Testing

  • Have another qualified analyst repeat the test using the same sample and equipment, if possible.
  • Compare the results to determine if there are significant discrepancies between analysts.
  • If discrepancies exist, investigate potential reasons for the differences.

Review Equipment Use Records

  • Check equipment logbooks to verify proper use and any noted issues during the time of testing.
  • Confirm that the analyst used the correct equipment and that it was properly calibrated and maintained.

Consider Human Factors

  • Assess any personal factors that could have affected the analyst’s performance, such as fatigue, illness, or personal stress.
  • Review the analyst’s work schedule leading up to the OOS result for any unusual patterns or extended hours.

By thoroughly assessing analyst performance using these methods, investigators can determine whether human error contributed to the OOS result and identify areas for improvement in training, procedures, or work environment. It’s important to approach this assessment objectively and supportively, focusing on systemic improvements rather than individual blame.

4. Examination of Environmental Factors

  • Review environmental monitoring data for the testing area
  • Check for any unusual events or conditions that could have affected the test

5. Data Analysis and Trending

  • Compare the OOS result with historical data and trends
  • Look for any patterns or anomalies that might explain the result

Conclusive vs. Inconclusive Evidence

Conclusive Evidence of Laboratory Error

To conclusively demonstrate laboratory error, you should be able to:

  • Identify a specific, documented error in the testing process
  • Reproduce the error and show how it leads to the OOS result
  • Demonstrate that correcting the error leads to an in-specification result

Examples of conclusive evidence might include:

  • Documented use of an expired reagent
  • Verified malfunction of testing equipment
  • Confirmed contamination of a negative control

Inconclusive Evidence

If the investigation reveals potential issues but cannot definitively link them to the OOS result, the evidence is considered inconclusive. This might include:

  • Minor deviations from SOPs that don’t clearly impact the result
  • Slight variations in environmental conditions
  • Analyst performance issues that aren’t directly tied to the specific test

Special Considerations for Microbiological Testing

Bioburden, endotoxin, and environmental monitoring tests present unique challenges due to their biological nature.

Bioburden Testing

  • Consider the possibility of sample contamination during collection or processing
  • Evaluate the recovery efficiency of the test method
  • Assess the potential for microbial growth during sample storage

Endotoxin Testing

  • Review the sample preparation process, including any dilution steps
  • Evaluate the potential for endotoxin masking or enhancement
  • Consider the impact of product formulation on the test method

Environmental Monitoring

  • Assess the sampling technique and equipment used
  • Consider the potential for transient environmental contamination
  • Evaluate the impact of recent cleaning or maintenance activities

Documenting the Investigation

Regardless of the outcome, it’s crucial to thoroughly document the investigation process. This documentation should include:

  • A clear description of the OOS result and initial observations
  • Detailed accounts of all investigative steps taken
  • Raw data and analytical results from the investigation
  • A comprehensive analysis of the evidence
  • A scientifically justified conclusion

Conclusion

Determining whether an invalidated OOS result conclusively demonstrates causative laboratory error requires a systematic, thorough, and well-documented investigation. For microbiological tests like bioburden, endotoxin, and environmental monitoring, this process can be particularly challenging due to the complex and sometimes variable nature of biological systems.

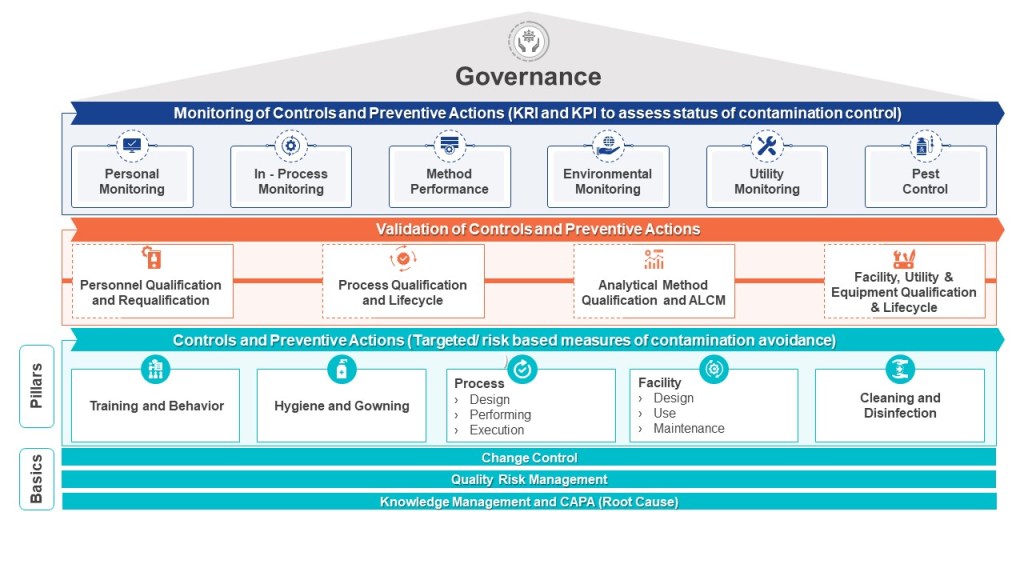
Remember, the goal is not to simply invalidate OOS results, but to understand the root cause and implement corrective and preventive actions. Only through rigorous investigation and continuous improvement can we ensure the quality and safety of pharmaceutical products. When investigating environmental and in-process results we are investigating the whole house of contamination control.

Failure to Investigate Critical Deviations: A Cautionary Tale from Sanofi’s FDA Warning Letter

The recent FDA warning letter issued to Sanofi on January 15, 2025 highlights a critical issue that continues to plague pharmaceutical manufacturers – inadequate investigation of deviations. Specifically, the FDA cited Sanofi for “failure to thoroughly investigate any unexplained discrepancy or failure of a batch or any of its components to meet any of its specifications, whether or not the batch has already been distributed.”

This observation underscores the importance of robust deviation investigation and CAPA (Corrective and Preventive Action) systems.

The Importance of Thorough Investigations

Investigating deviations is not just a regulatory requirement – it’s a critical part of ensuring product quality and patient safety. The objective of an investigation is not merely to perform the investigation, but to improve the reliability of our manufacturing operations, the ultimate objective being increased quality and availability of those regulated healthcare products.

When companies fail to thoroughly investigate deviations, they miss opportunities to:

  1. Identify root causes of quality issues
  2. Implement effective corrective actions
  3. Prevent recurrence of similar problems
  4. Improve overall manufacturing processes and controls

Common Pitfalls in Deviation Investigations

Some common reasons why deviation investigations fall short include:

  • Lack of trained, competent investigators
  • Inadequate time and resources allocated to investigations
  • Pressure to close investigations quickly
  • Failure to look beyond the immediate symptoms to identify true root causes
  • Over-reliance on “human error” as a root cause
  • Poor documentation of investigation activities and rationale

Building Better Investigation and CAPA Processes

To overcome these challenges and build more effective investigation and CAPA systems, companies should consider the following approaches:

1. Develop Investigator Competencies

Having competent investigators is crucial. Companies should:

  • Define required competencies for investigators
  • Provide comprehensive training on investigation techniques and tools
  • Implement mentoring programs for new investigators
  • Regularly assess and refresh investigator skills

2. Implement a Risk-Based Approach

Not all deviations require the same level of investigation. Using a risk-based approach allows companies to:

  • Prioritize critical deviations for in-depth investigation
  • Allocate appropriate resources based on potential impact
  • Ensure thorough investigations for high-risk issues

3. Use Structured Investigation Methods

Adopting structured investigation methods helps ensure consistency and thoroughness. Some useful tools include:

  • Fishbone diagrams for brainstorming potential causes
  • Why-Why analysis for drilling down to root causes
  • Fault tree analysis for complex issues
  • Timeline analysis to understand the sequence of events

4. Look Beyond Human Error

Human error is not a root cause. Instead of stopping at “operator error”, investigators should dig deeper to understand:

  • Why the error occurred
  • What system or process factors contributed to the error
  • How similar errors can be prevented in the future

5. Improve Documentation Practices

Thorough documentation is essential for demonstrating the adequacy of investigations to regulators. Key elements include:

  • Clear description of the deviation
  • Investigation steps taken
  • Data and evidence collected
  • Root cause analysis
  • Rationale for conclusions
  • Corrective and preventive actions

6. Implement Effective CAPAs

The investigation is only the first step – implementing effective corrective and preventive actions is crucial. Companies should:

  • Ensure CAPAs directly address identified root causes
  • Consider both short-term corrections and long-term preventive measures
  • Assess potential risks of proposed CAPAs
  • Establish clear timelines and accountability for CAPA implementation
  • Conduct effectiveness checks to verify CAPA impact

7. Foster a Culture of Quality

Management plays a critical role in creating an environment that supports thorough investigations.

  • Providing adequate time and resources for investigations
  • Encouraging open reporting of deviations without fear of blame
  • Recognizing and rewarding thorough investigation practices
  • Leading by example in prioritizing quality and patient safety

Common Pitfalls in Investigating Microbiological Contamination Events

When investigating microbiological contamination events there are often several pitfalls that can hinder the effectiveness of their investigations.

Inadequate Root Cause Analysis

One of the most significant pitfalls is failing to conduct a thorough root cause analysis. Investigators may be tempted to attribute contamination to superficial causes like “human error” without digging deeper into systemic issues. This shallow approach often leads to ineffective corrective actions that fail to prevent recurrence. Build in safeguards to avoid jumping to conclusion.

Overlooking Environmental Factors

Investigators sometimes neglect to consider the broader environmental context of contamination events. Factors such as air handling systems, water quality, and even compressed air can harbor contaminants. Failing to examine these potential sources may result in missed opportunities for identifying the true origin of contamination.

Insufficient Microbial Identification

Relying solely on phenotypic identification methods can lead to misidentification of contaminants. Phenotypic results can incorrectly point to laboratory contamination, while genotypic testing revealed a production-related issue. Using a combination of identification methods, including genotypic techniques, can provide more accurate and actionable results.

Premature Conclusion of Investigations

Pressure to close investigations quickly can lead to premature conclusions. This was evident in the Sanofi warning letter, where the FDA noted that investigations into critical deviations, including multiple microbiological contamination events, were inadequate. Rushing the process can result in overlooking important details and failing to implement effective corrective actions.

Failure to Consider Cross-Contamination

Investigators may not always consider the possibility of cross-contamination between products or areas within the facility. The presence of drug-resistant microbial contaminants, as observed in some studies, underscores the importance of examining potential routes of transmission and implementing strict hygiene procedures.

Inadequate Documentation

Poor documentation of investigation activities and rationale can undermine the credibility of findings and make it difficult to justify conclusions to regulators. The FDA’s warning letter to Sanofi highlighted this issue, noting that not all investigational activities were documented.

Neglecting Trending and Data Analysis

Failing to analyze contamination events in the context of historical data and trends can lead to missed patterns and recurring issues. Establishing and maintaining a comprehensive microflora database is essential for effective contamination control strategies and can provide valuable insights for investigations.

Insufficient Training of Investigators

Lack of properly trained and competent investigators can significantly impact the quality of contamination investigations. Ensuring that personnel have the necessary skills and knowledge to conduct thorough, science-based investigations is crucial for identifying true root causes and implementing effective corrective actions.

Conclusion

The Sanofi warning letter serves as a reminder of the critical importance of thorough deviation investigations in pharmaceutical manufacturing. By implementing robust investigation and CAPA processes, companies can not only avoid regulatory action but also drive continuous improvement in their operations. This requires ongoing commitment to developing investigator competencies, using structured methods, looking beyond superficial causes, and fostering a culture that values quality and learning from deviations.

As the industry continues to evolve, effective investigation practices will be essential for ensuring product quality, patient safety, and regulatory compliance. By viewing deviations not as failures but as opportunities for improvement, pharmaceutical manufacturers can build more resilient and reliable production systems.

How-How (Brown Cow)

Effective problem-solving is crucial for maintaining quality, making decisions, managing risks, and implementing changes. One visual brainstorming technique that can significantly enhance your work and should be in everyone’s tool box, is the How-How Diagram.

Understanding the How-How Diagram

The How-How Diagram is a structured approach to breaking down complex problems into manageable, actionable steps. It works by repeatedly asking “How?” to generate increasingly specific solutions. This method is particularly effective for collaborative problem-solving, as it encourages team members to think critically and creatively about potential solutions.

As similar structure as the Why-Why, many folks will find this tool comfortable to use.

Creating a How-How Diagram

Example template for a How-How diagram

Step 1: State the Problem

Begin by clearly defining the primary problem or need. Write this on a card or Post-It Note and place it on the left side of your workspace. Ensure that the problem is framed as a need to facilitate the “How?” question.

Step 2: Ask “How can this be done?”

Generate initial solutions by asking, “How can this be done?” Write each solution on a separate card and place them to the right of the problem statement.

Step 3: Identify Relationships

Some solutions may be alternatives, while others might need to occur together. Indicate these relationships by writing “and” or “or” between the cards.

Step 4: Repeat the Process

For each solution generated, ask “How?” again to break it down further. Continue this process, building a hierarchy of increasingly specific actions.

Step 5: Review and Refine

Once you’ve exhausted all possibilities, review the diagram. You may choose to draw connecting lines between related items, but it’s often best to leave this until the end to allow for easy rearrangement of cards.

Applying How-How Diagrams in CAPA Development

In CAPA processes, How-How Diagrams can be invaluable for:

  1. Root Cause Analysis: Break down potential causes of issues to identify the true root cause.
  2. Action Planning: Develop detailed, step-by-step corrective and preventive actions.
  3. Implementation Strategy: Map out the specific steps needed to implement CAPA solutions effectively.

Enhancing Risk Management with How-How Diagrams

Risk management can benefit from How-How Diagrams in several ways:

  1. Risk Identification: Systematically explore potential risks by asking “How could this go wrong?”
  2. Mitigation Planning: Develop comprehensive risk mitigation strategies by breaking down each risk into manageable actions.
  3. Contingency Planning: Create detailed contingency plans for identified risks.

Streamlining Change Control with How-How Diagrams

In change control processes, How-How Diagrams can:

  1. Impact Analysis: Thoroughly explore the potential impacts of proposed changes.
  2. Implementation Planning: Break down the change process into specific, actionable steps.
  3. Communication Strategy: Develop a clear plan for communicating changes to all stakeholders.

Best Practices for Using How-How Diagrams

To maximize the effectiveness of How-How Diagrams:

  1. Encourage Participation: Involve diverse team members to gain multiple perspectives.
  2. Stay Focused: Keep the discussion centered on the main problem or goal.
  3. Be Specific: Aim for concrete, actionable solutions rather than vague ideas.
  4. Prioritize: Once the diagram is complete, identify the most critical or impactful actions.
  5. Document: Capture the final diagram and use it as a reference for implementation and follow-up.

Conclusion

The How-How Diagram is a versatile and powerful tool for problem-solving by providing a structured approach to breaking down complex issues. It enables teams to develop comprehensive, actionable plans. Whether you’re addressing quality issues, managing risks, or implementing changes, the How-How Diagram can help you navigate the process with clarity and precision.

When Your Deviation/CAPA Program Runs Smoothly Expect a Period of Increased Deviations

One reason to invest in the CAPA program is that you will see fewer deviations over time as you fix issues. That is true, but it takes time. Yes, you’ve dealt with your backlog, improved your investigations, integrated risk management, built problem-solving into your processes, and are truly driving preventative actions. And yet your deviations remain high. What is going on?

It’s because you are getting good at things and working your way through the bolus of problems. Here’s what is going on:

  1. Improved Detection and Reporting: As a CAPA program matures, it enhances an organization’s ability to detect and report deviations. Employees become more adept at identifying and documenting deviations due to better training and awareness, leading to a temporary increase in reported deviations.
  2. Thorough Root Cause Analysis: A well-functioning CAPA program emphasizes thorough root cause analysis. This process often uncovers previously unnoticed issues and identifies additional deviations that need to be addressed.
  3. Increased Scrutiny and Compliance: As the CAPA program gains momentum, management usually scrutinizes it more, which can lead to the discovery of more deviations. Organizations become more vigilant in maintaining compliance, resulting in more deviations being reported and documented.
  4. Systematic Process Improvements: The CAPA process often leads to systemic improvements in processes and procedures. As these improvements are implemented, any deviations from the new standards are more likely to be identified and recorded, contributing to an initial rise in deviation reports.
  5. Cultural Shift Towards Quality: A successful CAPA program fosters a culture of quality and continuous improvement. Employees may feel more empowered and responsible for reporting deviations, increasing the number of deviations captured.

Expect these changes and build your metric program around them. Avoid introducing a metric like a reduction in deviations in the first year, as such a metric will drive bad behavior. Instead, focus on metrics that demonstrate the success of the changes and, over time, introduce metrics to see the overall benefits.

Best Ways to Address a Deviation Backlog

A deviation backlog in a regulated industry, such as pharmaceuticals, can pose significant risks to compliance, product quality, and overall operational efficiency. Addressing this backlog effectively requires a structured approach that prioritizes risk management, resource allocation, and continuous improvement.

You need to do two things first:

Prioritize Urgent Requests

  • Identify Critical Issues: Focus on resolving high-priority and time-sensitive deviations first to drive compliance.

Isolate and Organize

  • Separate Backlog from Ongoing Deviations: Create distinct queues for backlog deviations and new deviations to streamline management.
  • Create a Backlog Team: Assign a dedicated team to tackle the backlog, ensuring that regular support operations continue smoothly.

From there, you can then proceed into the next steps to tackle a deviation backlog:

1. Prioritize Based on Risk

Not all deviations have the same impact. Prioritizing the backlog based on the severity and risk part of each deviation is crucial. This involves:

  • Assessing Severity: Evaluate the potential impact of each deviation on product quality, patient safety, and regulatory compliance. Ideally you already classify deviations into categories such as minor, moderate, and major. based on those you will need to additional work to prioritize the backlog.
  • Risk-Based Approach: Focus on resolving high-risk deviations first to mitigate the most critical issues promptly.

2. Allocate Adequate Resources

Addressing a backlog efficiently often requires additional resources. Consider the following actions:

  • Increase Staffing: Temporarily augment your team with additional personnel or external consultants to handle the increased workload.
  • Specialized Teams: Form dedicated teams to focus solely on backlog reduction, ensuring that regular operations are not disrupted.

3. Improve and Make Robust Deviation Management Processes

A systematic approach to deviation management helps prevent backlogs from recurring. Key steps include:

  • Root Cause Analysis (RCA): Conduct thorough investigations to identify the underlying causes of deviations.
  • Corrective and Preventive Actions (CAPA): Develop and implement CAPA plans to address root causes and prevent future deviations. Ensure these plans are reviewed and approved by relevant stakeholders.

4. Regular Monitoring and Review

Continuous monitoring and regular reviews are essential to keep the backlog under control:

  • Track Progress: Use metrics and key performance indicators (KPIs) to monitor the progress of backlog reduction efforts. Tools like burndown charts can be helpful.
  • Periodic Reviews: Conduct regular review meetings to assess the status of the backlog and make necessary adjustments to the plan.

5. Enhance Deviation Management Systems

Improving your deviation management system can prevent future backlogs and streamline the resolution process:

  • Automation and Software Tools: Implement a eQMS or evaluate and improve the current one.
  • Training and Education: Ensure that all employees are well-trained in deviation management processes and understand the importance of timely reporting and resolution.

6. Foster a Culture of Continuous Improvement

Promote a culture that values continuous improvement and proactive problem-solving:

  • Encourage Reporting: Create an environment where employees feel comfortable reporting deviations without fear of retribution.
  • Learn from Deviations: Analyze deviation trends to identify areas for process improvement and implement changes to prevent recurrence.

7. Set Clear Goals and Deadlines

Establish clear goals and deadlines for backlog reduction:

  • Set Due Dates: Assign due dates for resolving backlog items to ensure timely action. Items that exceed their due dates should be reviewed and either expedited or reassessed for relevance.
  • Regular Updates: Keep all stakeholders informed about the progress and any changes to the plan through regular updates and communication.

Conclusion

Addressing a deviation backlog effectively requires a combination of prioritization, resource allocation, robust processes, continuous monitoring, and a culture of improvement. By implementing these strategies, organizations can reduce their backlog, improve compliance, and enhance overall product quality and safety.