The Role of the HACCP

Reading Strukmyer LLC’s recent FDA Warning Letter, and reflecting back to last year’s Colgate-Palmolive/Tom’s of Maine, Inc. Warning Letter, has me thinking of common language In both warning letters where the FDA asks for “A comprehensive, independent assessment of the design and control of your firm’s manufacturing operations, with a detailed and thorough review of all microbiological hazards.”

It is hard to read that as anything else than a clarion call to use a HACCP.

If that isn’t a HACCP, I don’t know what is. Given the FDA’s rich history and connection to the tool, it is difficult to imagine them thinking of any other tool. Sure, I can invent about 7 other ways to do that, but why bother when there is a great tool, full of powerful uses, waiting to be used that the regulators pretty much have in their DNA.

The Evolution of HACCP in FDA Regulation: A Journey to Enhanced Food Safety

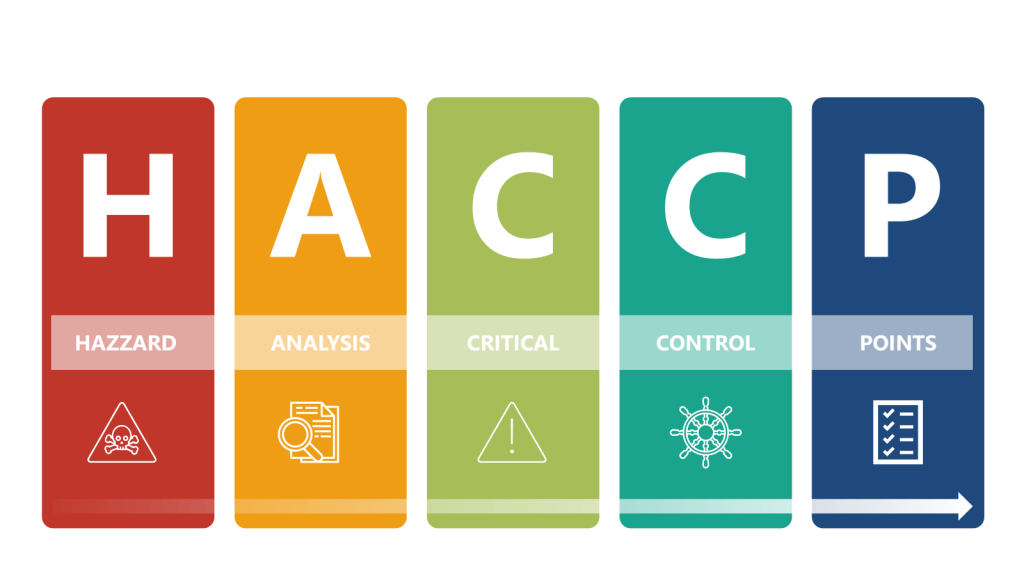
The Hazard Analysis and Critical Control Points (HACCP) system has a fascinating history that is deeply intertwined with FDA regulations. Initially developed in the 1960s by NASA, the Pillsbury Company, and the U.S. Army, HACCP was designed to ensure safe food for space missions. This pioneering collaboration aimed to prevent food safety issues by identifying and controlling critical points in food processing. The success of HACCP in space missions soon led to its application in commercial food production.

In the 1970s, Pillsbury applied HACCP to its commercial operations, driven by incidents such as the contamination of farina with glass. This prompted Pillsbury to adopt HACCP more widely across its production lines. A significant event in 1971 was a panel discussion at the National Conference on Food Protection, which led to the FDA’s involvement in promoting HACCP for food safety inspections. The FDA recognized the potential of HACCP to enhance food safety standards and began to integrate it into its regulatory framework.

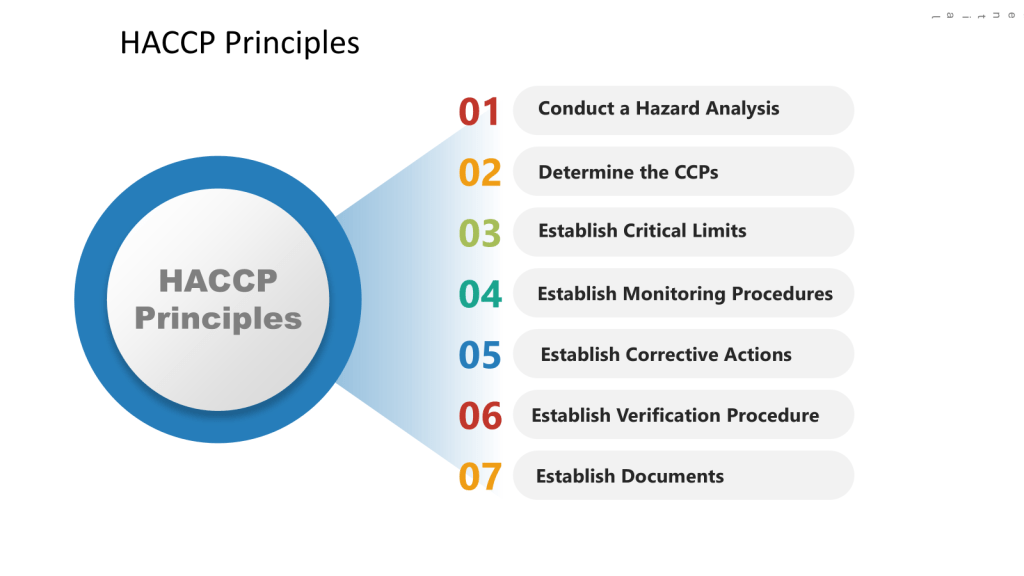
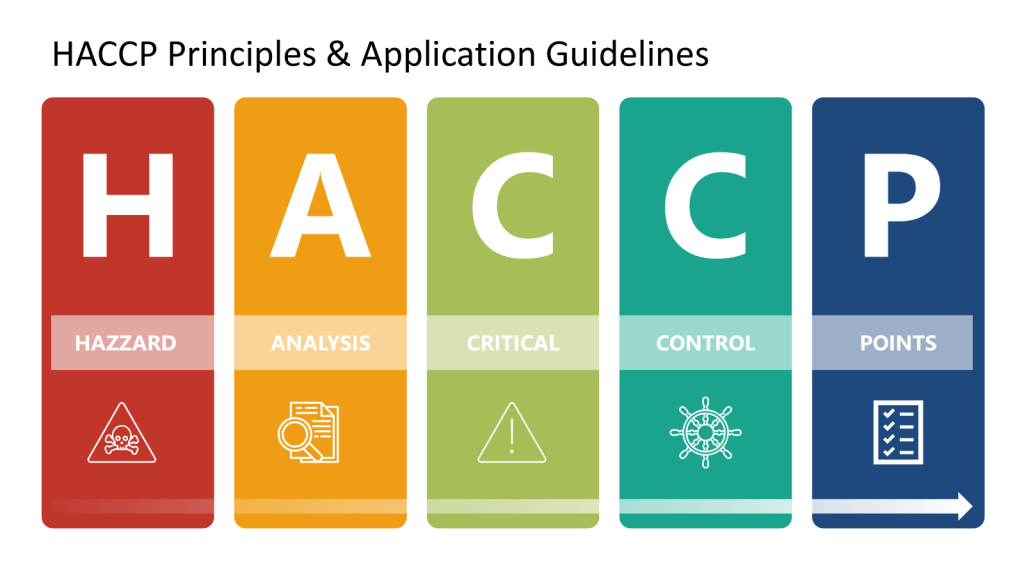
As HACCP gained prominence as a food safety standard in the 1980s and 1990s, the National Advisory Committee on Microbiological Criteria for Foods (NACMCF) refined its principles. The committee added preliminary steps and solidified the seven core principles of HACCP, which include hazard analysis, critical control points identification, establishing critical limits, monitoring procedures, corrective actions, verification procedures, and record-keeping. This structured approach helped standardize HACCP implementation across different sectors of the food industry.

A major milestone in the history of HACCP was the implementation of the Pathogen Reduction/HACCP Systems rule by the USDA’s Food Safety and Inspection Service (FSIS) in 1996. This rule mandated HACCP in meat and poultry processing facilities, marking a significant shift towards preventive food safety measures. By the late 1990s, HACCP became a requirement for all food businesses, with some exceptions for smaller operations. This widespread adoption underscored the importance of proactive food safety management.

The Food Safety Modernization Act (FSMA) of 2011 further emphasized preventive controls, including HACCP, to enhance food safety across the industry. FSMA shifted the focus from responding to food safety issues to preventing them, aligning with the core principles of HACCP. Today, HACCP remains a cornerstone of food safety management globally, with ongoing training and certification programs available to ensure compliance with evolving regulations. The FDA continues to support HACCP as part of its broader efforts to protect public health through safe food production and processing practices. As the food industry continues to evolve, the principles of HACCP remain essential for maintaining high standards of food safety and quality.

Why is a HACCP Useful in Biotech Manufacturing

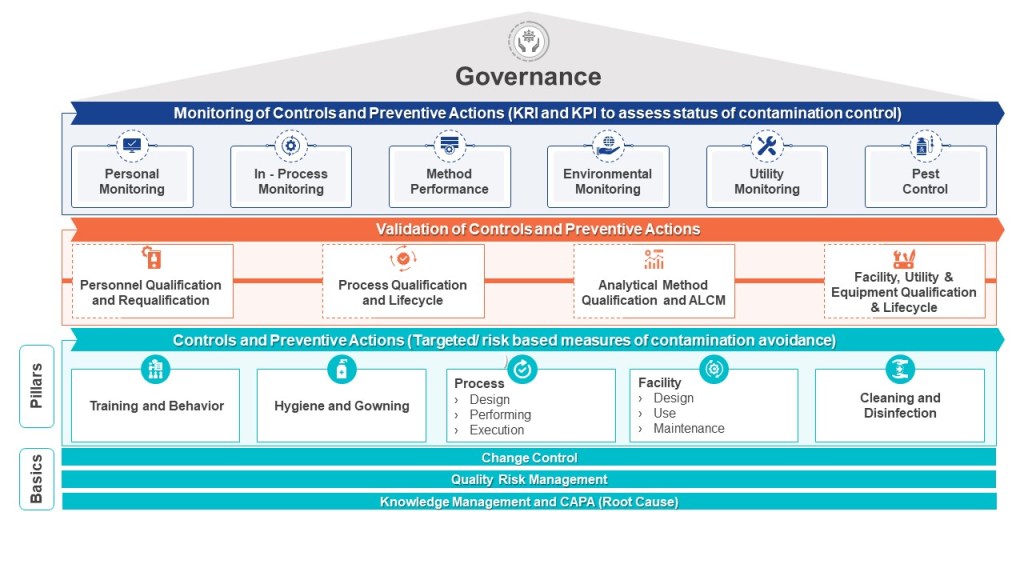
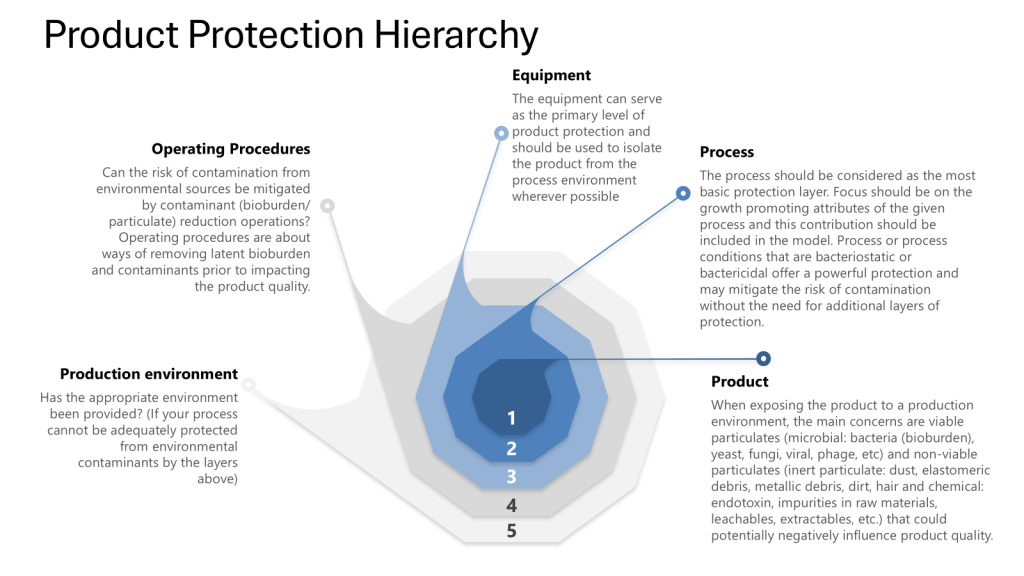
The HACCP seeks to map a process – the manufacturing process, one cleanroom, a series of interlinked cleanrooms, or the water system – and identifies hazards (a point of contamination) by understanding the personnel, material, waste, and other parts of the operational flow. These hazards are assessed at each step in the process for their likelihood and severity. Mitigations are taken to reduce the risk the hazard presents (“a contamination control point”). Where a risk cannot be adequately minimized (either in terms of its likelihood of occurrence, the severity of its nature, or both), this “contamination control point” should be subject to a form of detection so that the facility has an understanding of whether the microbial hazard was potentially present at a given time, for a given operation. In other words, the “critical control point” provides a reasoned area for selecting a monitoring location. For aseptic processing, for example, the target is elimination, even if this cannot be absolutely demonstrated.

The HACCP approach can easily be applied to pharmaceutical manufacturing where it proves very useful for microbial control. Although alternative risk tools exist, such as Failure Modes and Effects Analysis, the HACCP approach is better for microbial control.

The HACCP is a core part of an effective layers of control analysis.

Conducting a HACCP

HACCP provides a systematic approach to identifying and controlling potential hazards throughout the production process.

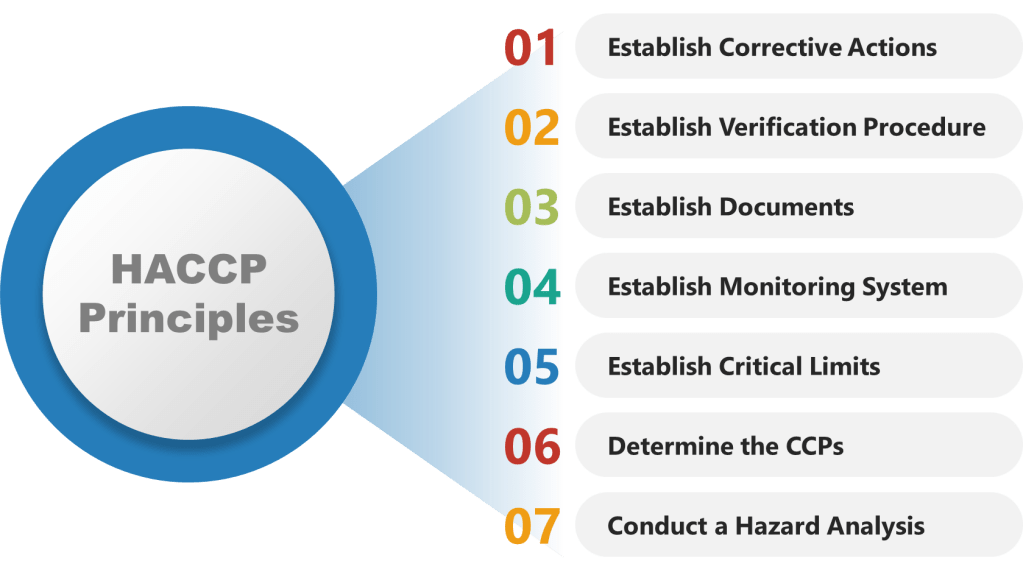
Step 1: Conduct a Hazard Analysis

  1. List All Process Steps: Begin by detailing every step involved in your biotech manufacturing process, from raw material sourcing to final product packaging. Make sure to walk down the process thoroughly.
  2. Identify Potential Hazards: At each step, identify potential biological, chemical, and physical hazards. Biological hazards might include microbial contamination, while chemical hazards could involve chemical impurities or inappropriate reagents. Physical hazards might include particulates or inappropriate packaging materials.
  3. Evaluate Severity and Likelihood: Assess the severity and likelihood of each identified hazard. This evaluation helps prioritize which hazards require immediate attention.
  4. Determine Preventive Measures: Develop strategies to control significant hazards. This might involve adjusting process conditions, improving cleaning protocols, or enhancing monitoring systems.
  5. Document Justifications: Record the rationale behind including or excluding hazards from your analysis. This documentation is essential for transparency and regulatory compliance.

Step 2: Determine Critical Control Points (CCPs)

  1. Identify Control Points: Any step where biological, chemical, or physical factors can be controlled is considered a control point.
  2. Determine CCPs: Use a decision tree to identify which control points are critical. A CCP is a step at which control can be applied and is essential to prevent or eliminate a hazard or reduce it to an acceptable level.
  3. Establish Critical Limits: For each CCP, define the maximum or minimum values to which parameters must be controlled. These limits ensure that hazards are effectively managed.
Control PointsCritical Control Points
Process steps where a control measure (mitigation activity) is necessary to prevent the hazard from occurringProcess steps where both control and monitoring are necessary to assure product quality and patient safety
Are not necessarily critical control points (CCPs)Are also control points
Determined from the risk associated with the hazardDetermined through a decision tree

Step 3: Establish Monitoring Procedures

  1. Develop Monitoring Plans: Create detailed plans for monitoring each CCP. This includes specifying what to monitor, how often, and who is responsible.
  2. Implement Monitoring Tools: Use appropriate tools and equipment to monitor CCPs effectively. This might include temperature sensors, microbial testing kits, or chemical analyzers.
  3. Record Monitoring Data: Ensure that all monitoring data is accurately recorded and stored for future reference.

Step 4: Establish Corrective Actions

  1. Define Corrective Actions: Develop procedures for when monitoring indicates that a CCP is not within its critical limits. These actions should restore control and prevent hazards.
  2. Proceduralize: You are establishing alternative control strategies here so make sure they are appropriately verified and controlled by process/procedure in the quality system.
  3. Train Staff: Ensure that all personnel understand and can implement corrective actions promptly.

Step 5: Establish Verification Procedures

  1. Regular Audits: Conduct regular audits to verify that the HACCP system is functioning correctly. This includes reviewing monitoring data and observing process operations.
  2. Validation Studies: Perform validation studies to confirm that CCPs are effective in controlling hazards.
  3. Continuous Improvement: Use audit findings to improve the HACCP system over time.

Step 6: Establish Documentation and Record-Keeping

  1. Maintain Detailed Records: Keep comprehensive records of all aspects of the HACCP system, including hazard analyses, CCPs, monitoring data, corrective actions, and verification activities.
  2. Ensure Traceability: Use documentation to ensure traceability throughout the production process, facilitating quick responses to any safety issues.

Step 7: Implement and Review the HACCP Plan

  1. Implement the Plan: Ensure that all personnel involved in biotech manufacturing understand and follow the HACCP plan.
  2. Regular Review: Regularly review and update the HACCP plan to reflect changes in processes, new hazards, or lessons learned from audits and incidents.

Determining Causative Laboratory Error in Bioburden, Endotoxin, and Environmental Monitoring OOS Results

In the previous post, we discussed the critical importance of thorough investigations into deviations, as highlighted by the recent FDA warning letter to Sanofi. Let us delve deeper into a specific aspect of these investigations: determining whether an invalidated out-of-specification (OOS) result for bioburden, endotoxin, or environmental monitoring action limit excursions conclusively demonstrates causative laboratory error.

When faced with an OOS result in microbiological testing, it’s crucial to conduct a thorough investigation before invalidating the result. The FDA expects companies to provide scientific justification and evidence that conclusively demonstrates a causative laboratory error if a result is to be invalidated.

Key Steps in Evaluating Laboratory Error

1. Review of Test Method and Procedure

  • Examine the standard operating procedure (SOP) for the test method
  • Verify that all steps were followed correctly
  • Check for any deviations from the established procedure

2. Evaluation of Equipment and Materials

Evaluation of Equipment and Materials is a critical step in determining whether laboratory error caused an out-of-specification (OOS) result, particularly for bioburden, endotoxin, or environmental monitoring tests. Here’s a detailed approach to performing this evaluation:

Equipment Assessment

Functionality Check
  • Run performance verification tests on key equipment used in the analysis
  • Review equipment logs for any recent malfunctions or irregularities
  • Verify that all equipment settings were correct for the specific test performed
Calibration Review
  • Check calibration records to ensure equipment was within its calibration period
  • Verify that calibration standards used were traceable and not expired
  • Review any recent calibration data for trends or shifts
Maintenance Evaluation
  • Examine maintenance logs for adherence to scheduled maintenance
  • Look for any recent repairs or adjustments that could affect performance
  • Verify that all preventive maintenance tasks were completed as required

Materials Evaluation

Reagent Quality Control
  • Check expiration dates of all reagents used in the test
  • Review storage conditions to ensure reagents were stored properly
  • Verify that quality control checks were performed on reagents before use
Media Assessment (for Bioburden and Environmental Monitoring)
  • Review growth promotion test results for culture media
  • Check pH and sterility of prepared media
  • Verify that media was stored at the correct temperature
Water Quality (for Endotoxin Testing)
  • Review records of water quality used for reagent preparation
  • Check for any recent changes in water purification systems
  • Verify endotoxin levels in water used for testing

Environmental Factors

Laboratory Conditions
  • Review temperature and humidity logs for the testing area
  • Check for any unusual events (e.g., power outages, HVAC issues) around the time of testing
  • Verify that environmental conditions met the requirements for the test method
Contamination Control
  • Examine cleaning logs for the laboratory area and equipment
  • Review recent environmental monitoring results for the testing area
  • Check for any breaches in aseptic technique during testing

Documentation Review

Standard Operating Procedures (SOPs)
  • Verify that the most current version of the SOP was used
  • Check for any recent changes to the SOP that might affect the test
  • Ensure all steps in the SOP were followed and documented
Equipment and Material Certifications
  • Review certificates of analysis for critical reagents and standards
  • Check equipment qualification documents (IQ/OQ/PQ) for compliance
  • Verify that all required certifications were current at the time of testing

By thoroughly evaluating equipment and materials using these detailed steps, laboratories can more conclusively determine whether an OOS result was due to laboratory error or represents a true product quality issue. This comprehensive approach helps ensure the integrity of microbiological testing and supports robust quality control in pharmaceutical manufacturing.

3. Assessment of Analyst Performance

Here are key aspects to consider when evaluating analyst performance during an OOS investigation:

Review Training Records

  • Examine the analyst’s training documentation to ensure they are qualified to perform the specific test method.
  • Verify that the analyst has completed all required periodic refresher training.
  • Check if the analyst has demonstrated proficiency in the particular test method recently.

Evaluate Recent Performance History

  • Review the analyst’s performance on similar tests over the past few months.
  • Look for any patterns or trends in the analyst’s results, such as consistently high or low readings.
  • Compare the analyst’s results with those of other analysts performing the same tests.

Conduct Interviews

  • Interview the analyst who performed the test to gather detailed information about the testing process.
  • Ask open-ended questions to encourage the analyst to describe any unusual occurrences or deviations from standard procedures.
  • Inquire about the analyst’s workload and any potential distractions during testing.

Observe Technique

  • If possible, have the analyst demonstrate the test method while being observed by a supervisor or senior analyst.
  • Pay attention to the analyst’s technique, including sample handling, reagent preparation, and equipment operation.
  • Note any deviations from standard operating procedures (SOPs) or good practices.

Review Documentation Practices

  • Examine the analyst’s laboratory notebooks and test records for completeness and accuracy.
  • Verify that all required information was recorded contemporaneously.
  • Check for any unusual notations or corrections in the documentation.

Assess Knowledge of Method and Equipment

  • Quiz the analyst on critical aspects of the test method and equipment operation.
  • Verify their understanding of acceptance criteria, potential sources of error, and troubleshooting procedures.
  • Ensure the analyst is aware of recent changes to SOPs or equipment calibration requirements.

Evaluate Workload and Environment

  • Consider the analyst’s workload at the time of testing, including any time pressures or competing priorities.
  • Assess the laboratory environment for potential distractions or interruptions that could have affected performance.
  • Review any recent changes in the analyst’s responsibilities or work schedule.

Perform Comparative Testing

  • Have another qualified analyst repeat the test using the same sample and equipment, if possible.
  • Compare the results to determine if there are significant discrepancies between analysts.
  • If discrepancies exist, investigate potential reasons for the differences.

Review Equipment Use Records

  • Check equipment logbooks to verify proper use and any noted issues during the time of testing.
  • Confirm that the analyst used the correct equipment and that it was properly calibrated and maintained.

Consider Human Factors

  • Assess any personal factors that could have affected the analyst’s performance, such as fatigue, illness, or personal stress.
  • Review the analyst’s work schedule leading up to the OOS result for any unusual patterns or extended hours.

By thoroughly assessing analyst performance using these methods, investigators can determine whether human error contributed to the OOS result and identify areas for improvement in training, procedures, or work environment. It’s important to approach this assessment objectively and supportively, focusing on systemic improvements rather than individual blame.

4. Examination of Environmental Factors

  • Review environmental monitoring data for the testing area
  • Check for any unusual events or conditions that could have affected the test

5. Data Analysis and Trending

  • Compare the OOS result with historical data and trends
  • Look for any patterns or anomalies that might explain the result

Conclusive vs. Inconclusive Evidence

Conclusive Evidence of Laboratory Error

To conclusively demonstrate laboratory error, you should be able to:

  • Identify a specific, documented error in the testing process
  • Reproduce the error and show how it leads to the OOS result
  • Demonstrate that correcting the error leads to an in-specification result

Examples of conclusive evidence might include:

  • Documented use of an expired reagent
  • Verified malfunction of testing equipment
  • Confirmed contamination of a negative control

Inconclusive Evidence

If the investigation reveals potential issues but cannot definitively link them to the OOS result, the evidence is considered inconclusive. This might include:

  • Minor deviations from SOPs that don’t clearly impact the result
  • Slight variations in environmental conditions
  • Analyst performance issues that aren’t directly tied to the specific test

Special Considerations for Microbiological Testing

Bioburden, endotoxin, and environmental monitoring tests present unique challenges due to their biological nature.

Bioburden Testing

  • Consider the possibility of sample contamination during collection or processing
  • Evaluate the recovery efficiency of the test method
  • Assess the potential for microbial growth during sample storage

Endotoxin Testing

  • Review the sample preparation process, including any dilution steps
  • Evaluate the potential for endotoxin masking or enhancement
  • Consider the impact of product formulation on the test method

Environmental Monitoring

  • Assess the sampling technique and equipment used
  • Consider the potential for transient environmental contamination
  • Evaluate the impact of recent cleaning or maintenance activities

Documenting the Investigation

Regardless of the outcome, it’s crucial to thoroughly document the investigation process. This documentation should include:

  • A clear description of the OOS result and initial observations
  • Detailed accounts of all investigative steps taken
  • Raw data and analytical results from the investigation
  • A comprehensive analysis of the evidence
  • A scientifically justified conclusion

Conclusion

Determining whether an invalidated OOS result conclusively demonstrates causative laboratory error requires a systematic, thorough, and well-documented investigation. For microbiological tests like bioburden, endotoxin, and environmental monitoring, this process can be particularly challenging due to the complex and sometimes variable nature of biological systems.

Remember, the goal is not to simply invalidate OOS results, but to understand the root cause and implement corrective and preventive actions. Only through rigorous investigation and continuous improvement can we ensure the quality and safety of pharmaceutical products. When investigating environmental and in-process results we are investigating the whole house of contamination control.

Failure to Investigate Critical Deviations: A Cautionary Tale from Sanofi’s FDA Warning Letter

The recent FDA warning letter issued to Sanofi on January 15, 2025 highlights a critical issue that continues to plague pharmaceutical manufacturers – inadequate investigation of deviations. Specifically, the FDA cited Sanofi for “failure to thoroughly investigate any unexplained discrepancy or failure of a batch or any of its components to meet any of its specifications, whether or not the batch has already been distributed.”

This observation underscores the importance of robust deviation investigation and CAPA (Corrective and Preventive Action) systems.

The Importance of Thorough Investigations

Investigating deviations is not just a regulatory requirement – it’s a critical part of ensuring product quality and patient safety. The objective of an investigation is not merely to perform the investigation, but to improve the reliability of our manufacturing operations, the ultimate objective being increased quality and availability of those regulated healthcare products.

When companies fail to thoroughly investigate deviations, they miss opportunities to:

  1. Identify root causes of quality issues
  2. Implement effective corrective actions
  3. Prevent recurrence of similar problems
  4. Improve overall manufacturing processes and controls

Common Pitfalls in Deviation Investigations

Some common reasons why deviation investigations fall short include:

  • Lack of trained, competent investigators
  • Inadequate time and resources allocated to investigations
  • Pressure to close investigations quickly
  • Failure to look beyond the immediate symptoms to identify true root causes
  • Over-reliance on “human error” as a root cause
  • Poor documentation of investigation activities and rationale

Building Better Investigation and CAPA Processes

To overcome these challenges and build more effective investigation and CAPA systems, companies should consider the following approaches:

1. Develop Investigator Competencies

Having competent investigators is crucial. Companies should:

  • Define required competencies for investigators
  • Provide comprehensive training on investigation techniques and tools
  • Implement mentoring programs for new investigators
  • Regularly assess and refresh investigator skills

2. Implement a Risk-Based Approach

Not all deviations require the same level of investigation. Using a risk-based approach allows companies to:

  • Prioritize critical deviations for in-depth investigation
  • Allocate appropriate resources based on potential impact
  • Ensure thorough investigations for high-risk issues

3. Use Structured Investigation Methods

Adopting structured investigation methods helps ensure consistency and thoroughness. Some useful tools include:

  • Fishbone diagrams for brainstorming potential causes
  • Why-Why analysis for drilling down to root causes
  • Fault tree analysis for complex issues
  • Timeline analysis to understand the sequence of events

4. Look Beyond Human Error

Human error is not a root cause. Instead of stopping at “operator error”, investigators should dig deeper to understand:

  • Why the error occurred
  • What system or process factors contributed to the error
  • How similar errors can be prevented in the future

5. Improve Documentation Practices

Thorough documentation is essential for demonstrating the adequacy of investigations to regulators. Key elements include:

  • Clear description of the deviation
  • Investigation steps taken
  • Data and evidence collected
  • Root cause analysis
  • Rationale for conclusions
  • Corrective and preventive actions

6. Implement Effective CAPAs

The investigation is only the first step – implementing effective corrective and preventive actions is crucial. Companies should:

  • Ensure CAPAs directly address identified root causes
  • Consider both short-term corrections and long-term preventive measures
  • Assess potential risks of proposed CAPAs
  • Establish clear timelines and accountability for CAPA implementation
  • Conduct effectiveness checks to verify CAPA impact

7. Foster a Culture of Quality

Management plays a critical role in creating an environment that supports thorough investigations.

  • Providing adequate time and resources for investigations
  • Encouraging open reporting of deviations without fear of blame
  • Recognizing and rewarding thorough investigation practices
  • Leading by example in prioritizing quality and patient safety

Common Pitfalls in Investigating Microbiological Contamination Events

When investigating microbiological contamination events there are often several pitfalls that can hinder the effectiveness of their investigations.

Inadequate Root Cause Analysis

One of the most significant pitfalls is failing to conduct a thorough root cause analysis. Investigators may be tempted to attribute contamination to superficial causes like “human error” without digging deeper into systemic issues. This shallow approach often leads to ineffective corrective actions that fail to prevent recurrence. Build in safeguards to avoid jumping to conclusion.

Overlooking Environmental Factors

Investigators sometimes neglect to consider the broader environmental context of contamination events. Factors such as air handling systems, water quality, and even compressed air can harbor contaminants. Failing to examine these potential sources may result in missed opportunities for identifying the true origin of contamination.

Insufficient Microbial Identification

Relying solely on phenotypic identification methods can lead to misidentification of contaminants. Phenotypic results can incorrectly point to laboratory contamination, while genotypic testing revealed a production-related issue. Using a combination of identification methods, including genotypic techniques, can provide more accurate and actionable results.

Premature Conclusion of Investigations

Pressure to close investigations quickly can lead to premature conclusions. This was evident in the Sanofi warning letter, where the FDA noted that investigations into critical deviations, including multiple microbiological contamination events, were inadequate. Rushing the process can result in overlooking important details and failing to implement effective corrective actions.

Failure to Consider Cross-Contamination

Investigators may not always consider the possibility of cross-contamination between products or areas within the facility. The presence of drug-resistant microbial contaminants, as observed in some studies, underscores the importance of examining potential routes of transmission and implementing strict hygiene procedures.

Inadequate Documentation

Poor documentation of investigation activities and rationale can undermine the credibility of findings and make it difficult to justify conclusions to regulators. The FDA’s warning letter to Sanofi highlighted this issue, noting that not all investigational activities were documented.

Neglecting Trending and Data Analysis

Failing to analyze contamination events in the context of historical data and trends can lead to missed patterns and recurring issues. Establishing and maintaining a comprehensive microflora database is essential for effective contamination control strategies and can provide valuable insights for investigations.

Insufficient Training of Investigators

Lack of properly trained and competent investigators can significantly impact the quality of contamination investigations. Ensuring that personnel have the necessary skills and knowledge to conduct thorough, science-based investigations is crucial for identifying true root causes and implementing effective corrective actions.

Conclusion

The Sanofi warning letter serves as a reminder of the critical importance of thorough deviation investigations in pharmaceutical manufacturing. By implementing robust investigation and CAPA processes, companies can not only avoid regulatory action but also drive continuous improvement in their operations. This requires ongoing commitment to developing investigator competencies, using structured methods, looking beyond superficial causes, and fostering a culture that values quality and learning from deviations.

As the industry continues to evolve, effective investigation practices will be essential for ensuring product quality, patient safety, and regulatory compliance. By viewing deviations not as failures but as opportunities for improvement, pharmaceutical manufacturers can build more resilient and reliable production systems.

Validating Manufacturing Process Closure for Biotech Utilizing Single-Use Systems (SUS)

Maintaining process closure is crucial for ensuring product quality and safety in biotechnology manufacturing, especially when using single-use systems (SUS). This approach is an integral part of the contamination control strategy (CCS). To validate process closure in SUS-based biotech manufacturing, a comprehensive method is necessary, incorporating:

  1. Risk assessment
  2. Thorough testing
  3. Ongoing monitoring

By employing risk analysis tools such as Hazard Analysis and Critical Control Points (HACCP) and Failure Mode and Effects Analysis (FMEA), manufacturers can identify potential weaknesses in their processes. Additionally, addressing all four layers of protection helps ensure process integrity and product safety. This risk-based approach to process closure validation is essential for maintaining the high standards required in biotechnology manufacturing, including meeting Annex 1.

Understanding Process Closure

Process closure refers to the isolation of the manufacturing process from the external environment to prevent contamination. In biotech, this is particularly crucial due to the sensitivity of biological products and the potential for microbial contamination.

The Four Layers of Protection

Throughout this process it is important to apply the four layers of protection that form the foundation of a robust contamination control strategy:

  1. Process: The inherent ability of the process to prevent or control contamination
  2. Equipment: The design and functionality of equipment to maintain closure
  3. Operating Procedures: The practices and protocols followed by personnel
  4. Production Environment: The controlled environment surrounding the process

I was discussing this with some colleagues this week (preparing for some risk assessments) and I was reminded that we really should put the Patient in at the center, the zero. Truer words have never been spoken as the patient truly is our zeroth law, the fundamental principle of the GxPs.

Key Steps for Validating Process Closure

Risk Assessment

Start with a comprehensive risk assessment using tools such as HACCP (Hazard Analysis and Critical Control Points) and FMEA (Failure Mode and Effects Analysis). It is important to remember this is not a one or another, but a multi-tiered approach where you first determine the hazards through the HACCP and then drill down into failures through an FMEA.

HACCP Approach

In the HACCP we will apply a systematic, preventative approach to identify hazards in the process with the aim to produce a documented plan to control these scenarios.

a) Conduct a hazard analysis
b) Identify Critical Control Points (CCPs)
c) Establish critical limits
d) Implement monitoring procedures
e) Define corrective actions
f) Establish verification procedures
g) Maintain documentation and records

FMEA Considerations

In the FMEA we will look for ways the process fails, focusing on the SUS components. We will evaluate failures at each level of control (process, equipment, operating procedure and environment).

  • Identify potential failure modes in the SUS components
  • Assess the severity, occurrence, and detectability of each failure mode
  • Calculate Risk Priority Numbers (RPN) to prioritize risks

Verification

Utilizing these risk assessments, define the user requirements specification (URS) for the SUS, focusing on critical aspects that could impact product quality and patient safety. This should include:

  • Process requirements (e.g. working volumes, flow rates, pressure ranges)
  • Material compatibility requirements
  • Sterility/bioburden control requirements
  • Leachables/extractables requirements
  • Integrity testing requirements
  • Connectivity and interface requirements

Following the ASTM E2500 approach, when we conduct the design review of the proposed SUS configuration, to evaluate how well it meets the URS, we want to ensure we cover:

  • Overall system design and component selection
  • Materials of construction
  • Sterilization/sanitization approach
  • Integrity assurance measures
  • Sampling and monitoring capabilities
  • Automation and control strategy

Circle back to the HACCP and FMEA to ensure they appropriately cover critical aspects like:

  • Loss of sterility/integrity
  • Leachables/extractables introduction
  • Bioburden control failures
  • Cross-contamination risks
  • Process parameter deviations

These risk assessments will define critical control parameters and acceptance criteria based on the risk assessment. These will form the basis for verification testing. We will through our verification plan have an appropriate approach to:

  • Verify proper installation of SUS components
  • Check integrity of connections and seals
  • Confirm correct placement of sensors and monitoring devices
  • Document as-built system configuration
  • Test system integrity under various operating conditions
  • Perform leak tests on connections and seals
  • Validate sterilization processes for SUS components
  • Verify functionality of critical sensors and control
  • Run simulated production cycles
  • Monitor for contamination using sensitive detection methods
  • Verify maintenance of sterility throughout the process
  • Assess product quality attributes

The verification strategy will leverage a variety of supplier documentation and internal testing.

Closure Analysis Risk Assessment (CLARA)

Acceptance and release will be to perform a detailed CLARA to:

  • Identify all potential points of contamination ingress
  • Assess the effectiveness of closure mechanisms
  • Evaluate the robustness of aseptic connections
  • Determine the impact of manual interventions on system closure

On Going Use

Coming out of our HACCP we will have a monitoring and verification plan, this will include some important aspects based on our CCPs.

  • Integrity Testing
    • Implement routine integrity testing protocols for SUS components
    • Utilize methods such as pressure decay tests or helium leak detection
    • Establish acceptance criteria for integrity tests
  • Environmental Monitoring
    • Develop a comprehensive environmental monitoring program
    • Include viable and non-viable particle monitoring
    • Establish alert and action limits for environmental contaminants
  • Operator Training and Qualification
    • Develop detailed SOPs for SUS handling and assembly
    • Implement a rigorous training program for operators
    • Qualify operators through practical assessments
  • Change Control and Continuous Improvement
    • Establish a robust change control process for any modifications to the SUS or process
    • Regularly review and update risk assessments based on new data or changes
    • Implement a continuous improvement program to enhance process closure

Leveraging the Four Layers of Protection

Throughout the validation process, ensure that each layer of protection is addressed:

  1. Process:
    • Optimize process parameters to minimize contamination risks
    • Implement in-process controls to detect deviations
  2. Equipment:
    • Validate the design and functionality of SUS components
    • Ensure proper integration of SUS with existing equipment
  3. Operating Procedures:
    • Develop and validate aseptic techniques for SUS handling
    • Implement procedures for system assembly and disassembly
  4. Production Environment:
    • Qualify the cleanroom environment
    • Validate HVAC systems and air filtration

Remember that validation is an ongoing process. Regular reviews, updates to risk assessments, and incorporation of new technologies and best practices are essential for maintaining a state of control in biotech manufacturing using single-use systems.

Connected to the Contamination Control Strategy

Closed systems are a key element of the overall contamination control strategy with closed processing and closed systems now accepted as the most effective contamination control risk mitigation strategy. I might not be able to manufacture in the woods yet, but darn if I won’t keep trying.

They serve as a primary barrier to prevent contamination from the manufacturing environment by helping to mitigate the risk of contamination by isolating the product from the surrounding environment. Closed systems are the key protective measure to prevent contamination from the manufacturing environment and cross-contamination from neighboring operations.

The risk assessments leveraged during the implementation of closed systems are a crucial part of developing an effective CCS and will communicate the (ideally) robust methods used to protect products from environmental contamination and cross-contamination. This is tied into the facility design, environmental controls, risk assessments, and overall manufacturing strategies, which are the key components of a comprehensive CCS.

Risk Management for the 4 Levels of Controls for Product

There are really 4 layers of protection for our pharmaceutical product.

  1. Process controls
  2. Equipment controls
  3. Operating procedure controls
  4. Production environment controls

These individually and together are evaluated as part of the HACCP process, forming our layers of control analysis.

Process Controls:

    • Conduct a detailed hazard analysis for each step in the production process
    • Identify critical control points (CCPs) where hazards can be prevented, eliminated or reduced
    • Establish critical limits for each CCP (e.g. time/temperature parameters)
    • Develop monitoring procedures to ensure critical limits are met
    • Establish corrective actions if critical limits are not met
    • Validate and verify the effectiveness of process controls

    Equipment Controls:

      • Evaluate equipment design and materials for hazards
      • Establish preventive maintenance schedules
      • Develop sanitation and cleaning procedures for equipment
      • Calibrate equipment and instruments regularly
      • Validate equipment performance for critical processes
      • Establish equipment monitoring procedures

      Operating Procedure Controls:

        • Develop standard operating procedures (SOPs) for all key tasks
        • Create good manufacturing practices (GMPs) for personnel
        • Establish hygiene and sanitation procedures
        • Implement employee training programs on contamination control
        • Develop recordkeeping and documentation procedures
        • Regularly review and update operating procedures

        Production Environment Controls:

          • Design facility layout to prevent cross-contamination
          • Establish zoning and traffic patterns
          • Implement pest control programs
          • Develop air handling and filtration systems
          • Create sanitation schedules for production areas
          • Monitor environmental conditions (temperature, humidity, etc.)
          • Conduct regular environmental testing

          The key is to use a systematic, science-based approach to identify potential hazards at each layer and implement appropriate preventive controls. The controls should be validated, monitored, verified and documented as part of the overall contamination control strategy (system). Regular review and updates are needed to ensure the controls remain effective.