PDCA and OODA

PDCA (and it’s variants) are a pretty tried and true model for process improvement. In the PDCA model a plan is structured in four steps: P (plan) D (do) C (check) A (act). The intention is create a structured cycle that allows the process to flow in accordance with the objectives to be achieved (P), execute what was planned (D), check whether the objectives were achieved with emphasis on the verification of what went right and what went wrong (C) and identify factors of success or failure to feed a new process of planning (A).

Conceptually, the organization will be a fast turning wheel of endlessly learning from mistakes and seeking to maximize processes in order to remain forever in pursuit of strategic objectives, endlessly searching for the maximum efficiency and effectiveness of the system.
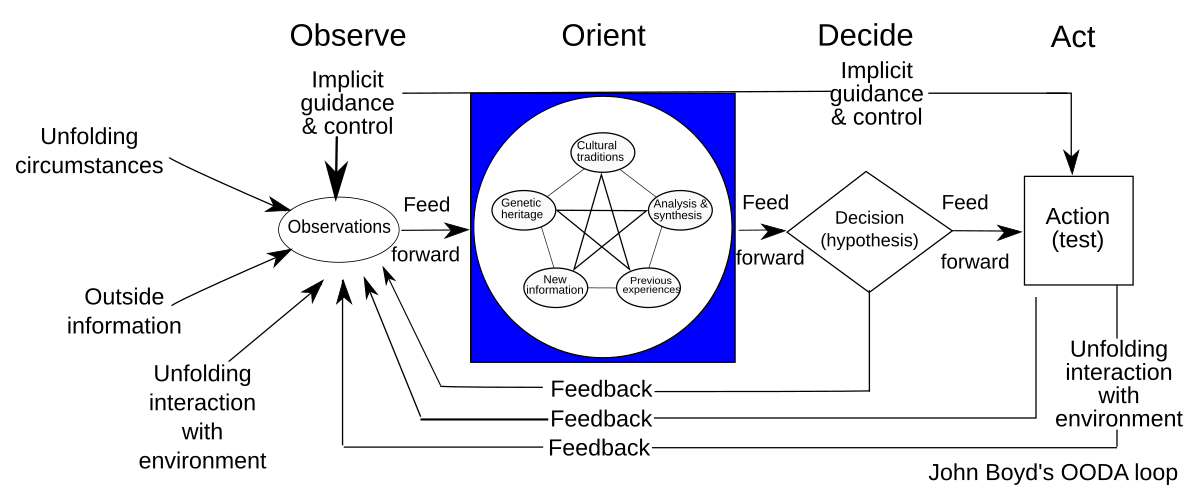
The OODA Loop

The OODA loop or cycle was designed by John R. Boyd and consists of a cycle of four phases:
Observe, Orient, Decide and Act (OODA).

  • Observe: Based on implicit guidance and control, observations are made regarding unfolding circumstances, outside information, and dynamic interaction with the environment (including the result of prior actions).
  • Orient: Observations from the prior stage are deconstructed into separate component
    pieces; then synthesized and analyzed in several contexts such as cultural traditions, genetic
    heritage, and previous experiences; and then combined together for the purposes of
    analysis and synthesis to inform the next phase.
  • Decide: In this phase, hypotheses are evaluated, and a decision is made.
  • Act: Based on the decision from the prior stage, action is taken to achieve a desired effect
    or result

While similar to the PDCA improvement of a known system making it more effective, efficient or effective (depending on the effect to be expected), the OODA strives to model a framework for situational awareness.

Boyd’s concentration on the specific set of circumstances relevant to military situations had for years meant the OODA loop has not received a lot of wide spread interest. I’ve been seeing a lot of recent adaptations of the OODA loop try to expand to address the needs of operating in volatile, uncertain, complex and ambiguous (VUCA) situations. I especially like seeing it as part of resilience and business continuity.

Enhanced Decision-Making Speed and Agility

    The OODA loop enables organizations to make faster, more informed decisions in rapidly changing environments. By continuously cycling through the observe-orient-decide-act process, organizations can respond more quickly to market crises, threats, and emerging opportunities.

    Improved Situational Awareness

      The observation and orientation phases help organizations maintain a comprehensive understanding of their operating environment. This enhanced situational awareness allows us to identify trends, threats, and opportunities more effectively.

      Better Adaptability to Change

        The iterative nature of the OODA loop promotes continuous learning and adaptation. This fosters a culture of flexibility and responsiveness, enabling organizations to adjust their strategies and operations as circumstances evolve.

        Enhanced Crisis Management

          In high-pressure situations or crises, the OODA loop provides a structured approach for rapid, effective decision-making. This can be invaluable for managing unexpected challenges or emergencies.

          Improved Team Coordination and Communication

            The OODA process encourages clear communication and coordination among team members as they move through each phase. This can lead to better team cohesion and more effective execution of strategies.

            Data-Driven Culture

              The OODA loop emphasizes the importance of observation and orientation based on current data. This promotes a data-driven culture where decisions are made based on real-time information rather than outdated assumptions.

              Continuous Improvement

                The cyclical nature of the OODA loop supports ongoing refinement of processes and strategies. Each iteration provides feedback that can be used to improve future observations, orientations, decisions, and actions.

                Complementary Perspectives

                PDCA is typically used for long-term, systematic improvement projects, while OODA is better suited for rapid decision-making in dynamic environments. Using both allows organizations to address both strategic and tactical needs.

                Integration Points

                1. Observation and Planning
                  • OODA’s “Observe” step can feed into PDCA’s “Plan” phase by providing real-time situational awareness.
                  • PDCA’s structured planning can enhance OODA’s orientation process.
                2. Execution
                  • PDCA’s “Do” phase can incorporate OODA loops for quick adjustments during implementation.
                  • OODA’s “Act” step can trigger a new PDCA cycle for more comprehensive improvements.
                3. Evaluation
                  • PDCA’s “Check” phase can use OODA’s observation techniques for more thorough assessment.
                  • OODA’s rapid decision-making can inform PDCA’s “Act” phase for faster course corrections.

                Prioritization: MoSCoW, Binary and Pairwise

                Prioritization tools are essential for effective decision-making. They help teams decide where to focus their efforts, ensuring that the most critical tasks are completed first.

                MoSCoW Prioritization

                The MoSCoW method is a widely used prioritization technique in project management, particularly within agile frameworks. It categorizes tasks or requirements into four distinct categories:

                • Must Have: Essential requirements that are critical for the project’s success. Without these, the project is considered a failure.
                • Should Have: Important but not critical requirements. These can be deferred if necessary but should be included if possible.
                • Could Have: Desirable but not necessary requirements. These are nice-to-haves that can be included if time and resources permit.
                • Won’t Have: Requirements agreed to be excluded from the current project scope. These might be considered for future phases.

                Advantages:

                • Clarity and Focus: Clearly distinguish between essential and non-essential requirements, helping teams focus on what truly matters.
                • Stakeholder Alignment: Facilitates discussions and alignment among stakeholders regarding priorities.
                • Flexibility: Can be adapted to various project types and industries.

                Disadvantages:

                • Ambiguity: May not provide clear guidance on prioritizing within each category.
                • Subjectivity: Decisions can be influenced by stakeholder biases or political considerations.
                • Resource Allocation: Requires careful allocation of resources to ensure that “Must Have” items are prioritized appropriately.

                Binary Prioritization

                Binary prioritization, often implemented using a binary search tree, is a method for systematically comparing and ranking requirements. Each requirement is compared against others, creating a hierarchical list of priorities.

                Process:

                1. Root Node: Start with one requirement as the root node.
                2. Comparison: Compare each succeeding requirement to the root node, establishing child nodes based on priority.
                3. Hierarchy: Continue creating a long list of prioritized requirements, forming a binary tree structure.

                Advantages:

                • Systematic Approach: Provides a clear, structured way to compare and rank requirements.
                • Granularity: Offers detailed prioritization, ensuring that each requirement is evaluated against others.
                • Objectivity: Reduces subjectivity by using a consistent comparison method.

                Disadvantages:

                • Complexity: Can be complex and time-consuming, especially for large projects with many requirements.
                • Resource Intensive: Requires significant effort to compare each requirement systematically.
                • Scalability: It may become unwieldy with many requirements, making it difficult to manage.

                Pairwise Comparison

                Pairwise or paired comparison is a method for prioritizing and ranking multiple options by comparing them in pairs. This technique is particularly useful when quantitative, objective data is not available, and decisions need to be made based on subjective criteria.

                How Pairwise Comparison Works

                1. Define Criteria: Establish clear criteria for evaluation, such as cost, strategic importance, urgency, resource allocation, or alignment with objectives.
                2. Create a Matrix: List all the items to be compared along its rows and columns. Each cell in the matrix represents a comparison between two items.
                3. Make Comparisons: For each pair of items, decide which item is more important or preferred based on the established criteria. Mark the preferred item in the corresponding cell of the matrix.
                4. Calculate Scores: After all comparisons are made, count the times each item was preferred. The item with the highest count is ranked highest in priority.

                Benefits of Pairwise Comparison

                • Simplicity: It is easy to understand and implement, requiring no special training[3].
                • Objectivity: Reduces bias and emotional influence in decision-making by focusing on direct comparisons.
                • Clarity: Provides a clear ranking of options, making it easier to prioritize tasks or decisions.
                • Engagement: Encourages collaborative discussions among team members, leading to a better understanding of different perspectives.

                Limitations of Pairwise Comparison

                • Scalability: The number of comparisons increases significantly with the number of items, making it less practical for large lists.
                • Relative Importance: Does not allow for measuring the intensity of preferences, only the relative ranking.
                • Cognitive Load: Can be mentally taxing if the list of items is long or the criteria are complex.

                Applications of Pairwise Comparison

                • Project Management: Prioritizing project tasks or deliverables.
                • Product Development: Ranking features or requirements based on customer needs.
                • Survey Research: Understanding preferences and establishing relative rankings in surveys.
                • Strategic Decision-Making: Informing decisions by comparing strategic options or initiatives.

                Example of Pairwise Comparison

                Imagine a project team needs to prioritize seven project deliverables labeled A to G. They create a pairwise comparison matrix and compare each deliverable against the others. For instance, deliverable A is compared to B, then A to C, and so on. The team marks the preferred deliverable in each comparison. After completing all comparisons, they count the number of times each deliverable was preferred to determine the final ranking.

                Comparison of MoSCoW Prioritization, Binary Prioritization, and Pairwise Comparison

                Here’s a detailed comparison of the three prioritization methods in a tabular format:

                AspectMoSCoW PrioritizationBinary PrioritizationPairwise Comparison
                Key AspectsCategorizes tasks into Must, Should, Could, and Won’t haveCompares requirements in pairs to create a hierarchical listCompares options in pairs to determine relative preferences
                AdvantagesSimple to understand, clear categorization, stakeholder alignmentSystematic approach, detailed prioritization, reduces subjectivityIntuitive, suitable for long lists, provides numerical results
                DisadvantagesSubjective categorization, may oversimplify complex projectsTime-consuming for large projects, may become complexCan be cognitively difficult, potential for inconsistency (transitivity violations)
                ClarityHigh-level categorizationDetailed prioritization within a hierarchyProvides clear ranking based on direct comparisons
                Stakeholder InvolvementHigh involvement and alignment requiredLess direct involvement, more systematicEncourages collaborative discussions, but can be intensive
                FlexibilityAdaptable to various projectsBest suited for projects with clear requirementsSuitable for both small and large lists, but can be complex for very large sets
                ComplexitySimple to understand and implementMore complex and time-consumingCan be cognitively taxing, especially for large numbers of comparisons
                Resource AllocationRequires careful planningSystematic but resource-intensiveRequires significant effort for large sets of comparisons

                Conclusion

                Each prioritization method has its own strengths and weaknesses, making them suitable for different contexts:

                • MoSCoW Prioritization is ideal for projects needing clear, high-level categorization and strong stakeholder alignment. It is simple and effective for initial prioritization but may lack the granularity needed for more complex projects.
                • Binary Prioritization offers a systematic and detailed approach, reducing subjectivity. However, it can be time-consuming and complex, especially for large projects.
                • Pairwise Comparison is intuitive and provides clear numerical results, making it suitable for long lists of options. It encourages collaborative decision-making but can be cognitively challenging and may lead to inconsistencies if not carefully managed.

                Choosing the right method depends on the specific needs and context of the decision, including the number of items to prioritize, the level of detail required, and the involvement of stakeholders.

                Task Decomposition

                http://smbc-comics.com/comic/break-it-down

                Task decomposition is a systematic approach to breaking down a complex task into smaller, more manageable components. A more detailed version of task analysis helps organize work, improve understanding, and facilitate effective execution.

                Step 1: Understand the Task

                The first step in task decomposition is to fully understand the task at hand. This involves defining the main objective, identifying the final deliverables, and recognizing all the requirements and constraints associated with the task.

                Step 2: Break Down the Task

                Once the task is clearly understood, the next step is to break it down into smaller, more manageable parts. This can be done by identifying the major components or phases of the task and then further dividing these into subtasks.

                Techniques for Breaking Down Tasks:

                • Hierarchical Task Analysis (HTA): This involves creating a hierarchy of tasks, starting with the main task at the top and breaking it down into subtasks and further into individual actions.
                • Functional Decomposition: Focus on dividing the task based on different functions or processes involved.
                • Object-Oriented Decomposition: Used primarily in software development, where tasks are divided based on the objects or data involved.

                Step 3: Sequence the Tasks

                Determine the logical order in which the subtasks should be completed. This involves identifying dependencies between tasks, where some tasks must precede others.

                Step 4: Assign Resources and Estimate Time

                Assign the appropriate resources to each subtask, including personnel, tools, and materials. Additionally, estimate the time required to complete each subtask. This helps in scheduling and resource allocation.

                Step 5: Prioritize Tasks

                Not all tasks are equally important. Prioritize tasks based on their impact on the overall project, their urgency, and their dependencies.

                Step 6: Monitor and Adjust

                Once the decomposition and planning are in place, the execution phase begins. It’s important to monitor the progress of tasks, check adherence to timelines, and make adjustments as necessary. This might involve re-prioritizing tasks or re-allocating resources to address any bottlenecks or delays.

                Step 7: Documentation and Feedback

                Document the entire process and gather feedback. This documentation will serve as a valuable reference for future projects, and feedback can help in refining the decomposition process.

                Task decomposition is a dynamic process that may require iterative adjustments. Used well, it is a powerful tool in the quality toolbox.

                Preliminary Hazard Analysis

                The Preliminary Hazard Analysis (PHA) is a risk tool that is used during initial design and development, thus the name “preliminary”, to identify systematic hazards that affect the intended function of the design to provide an opportunity to modify requirements that will help avoid issues in the design.

                Like a fair amount of tools used in risk, the PHA was created by the US Army. ANSI/ASSP Z.590.3 “Prevention through Design, Guidelines for Addressing Occupational Hazards and Risks in Design and Redesign Processes” makes this one of the eight risk assessment tools everyone should know.

                Taking the time to perform a PHA early on in the design will speed up the design process and avoid costly mistakes. Any identified hazards that cannot be avoided or eliminated are then controlled so that the risk is reduced to an acceptable level.

                PHAs can also be used to examine existing systems, prioritize risk levels and select those systems requiring further study. The use of a single PHA may also be appropriate for simple, less compelx systems.

                Main steps of PHA

                A. Identify Hazards

                Like a Structured What-If, the Preliminary Hazard Analysis benefits from an established list of general categories:

                • by the source of risk: raw materials, environmental, equipment, usability and human factors, safety hazards, etc.
                • by consequence, aspects or dimensions of objectives or performance

                Based on the established list, a preliminary hazard list is identified which lists the potential, significant hazards associated with a design. The purpose of the preliminary hazard list is to initially identify the most evident or worst-credible hazards that could occur in the system being designed. Such hazards may be inherent to the design or created by the interaction with other systems/environment/etc.

                A team should be involved in collecting and reviewing.

                B. Sequence of Events

                Once the hazards are identified, the sequence of events that leads from each hazard to various hazardous situations is identified.

                C. Hazardous Situation

                For each sequence of events, we identify one or more hazardous situations.

                D. Impact

                For each hazardous situation, we identify one or more outcomes (or harms).

                E. Severity and occurrence of the impact

                Based on the identified outcomes/harms the severity is determined. An occurrence or probability is determined for each sequence of events that leads from the hazard to the hazardous situation to the outcome.

                Based on severity and likelihood of occurrence a risk level is determined.

                From hazard to a variety of harms

                I tend to favor a 5×5 matrix for a PHA, though some use 3×3, and I’ve even seen 4×5.

                Intended outcomes

                Likelihood of Occurrence

                Severity Rating

                Impact to failure scale

                1

                Very unlikely

                2

                Likely

                3

                Possible

                4

                Likely

                5

                Very Likely

                5

                Complete failure

                5

                10

                15

                20

                25

                4

                Maximum tolerable failure

                4

                8

                12

                16

                20

                3

                Maximum anticipated failure

                3

                6

                9

                12

                15

                2

                Minimum anticipated failure

                2

                4

                6

                8

                10

                1

                Negligible

                1

                2

                3

                4

                5

                Very high risk: 15 or greater, High risk 9-14, Medium risk 5-8, Low risk 1-4


                F. Risk Control Measures

                Based on the risk level risk controls and developed and applied. These risk controls will help the design team create new requirements that will drive the design.

                On-going risks should be evaluated for the risk register.

                Flow Chart

                The flow chart is a simple, but important, graphic organizer. Placing the states or steps of an event or process into the correct sequence allows you to reach conclusions and make predictions.

                However, its simplicity means we don’t always work to be consistent and can benefit from a little effort to ensure users are aligned.

                I am a huge fan of including flow charts in all process and procedure documents.

                Steps for Building a flow chart

                Capture

                Capture the events or steps of the process. Resist the urge to arrange them sequentially and concentrate on capturing the events/steps only.

                Cull

                If there are more than eight steps in a flow chart we start creating cognitive overload. If a process or procedure has more than eight steps you need to:

                1. Ensure the steps are at the right level, sometimes we have substeps represented and we can cull that. Ensure they are all on the same level of process/procedure/task.
                2. Decide we need to break the procedure into multiple documents. This is a great way to decide what work instructions are necessary.
                3. Look for opportunity for process improvement.

                Sequence the events and draw the flow chart

                The focus now shifts to temporal relations. The correct sequential arrangements of steps or events helps to reach conclusions about past events and prepare for future events.

                Example

                I’m writing the procedure for my mornings, I capture the following:

                1. Eat breakfast
                2. Take shower
                3. Take dog out
                4. Get dressed
                5. Decide on tea
                6. Heat water
                7. Drink tea
                8. Read for 30 minutes
                9. Deal with morning email
                10. Snuggle with dog

                Taking a look at the list I realize that not everything is on the same level of process/procedure/task and end up with a shorter list.

                1. Breakfast
                2. Take shower
                3. Take dog out
                4. Get dressed
                5. Read for 30 minutes
                6. Deal with morning email
                7. Snuggle with dog

                Notice how I combined all the tea stuff into a breakfast category. When brainstorming my list I put a lot of weight on tea, because it is important to me (yes I have been using tea as a training example since 2005, I just love tea).

                I can then put them in sequence:

                Flow Chart for my morning

                When I was making things sequential I realized that two of my activities (read and dog snuggle) were concurrent, so I combined them as one step.