Quality systems often focus on efficiency—doing things right—and effectiveness—doing the right things. However, as industries evolve and systems grow more complex, a third dimension is essential to achieving true excellence: elegance. Elegance in quality systems is not merely about simplicity but about creating solutions that are intuitive, sustainable, and seamlessly integrated into organizational workflows.
Elegance elevates quality systems by addressing complexity in a way that reduces friction while maintaining sophistication. It involves designing processes that are not only functional but also intuitive and visually appealing, encouraging engagement rather than resistance. For example, an elegant deviation management system might replace cumbersome, multi-step forms with guided tools that simplify root cause analysis while improving accuracy. By integrating such elements, organizations can achieve compliance with less effort and greater satisfaction among users.
When viewed through the lens of the Excellence Triad, elegance acts as a multiplier for both efficiency and effectiveness. Efficiency focuses on streamlining processes to save time and resources, while effectiveness ensures those processes align with organizational goals and regulatory requirements. Elegance bridges these two dimensions by creating systems that are not only efficient and effective but also enjoyable to use. For instance, a visually intuitive risk assessment matrix can enhance both the speed of decision-making (efficiency) and the accuracy of risk evaluations (effectiveness), all while fostering user engagement through its elegant design.
To imagine how elegance can be embedded into a quality system, consider this high-level example of an elegance-infused quality plan aimed at increasing maturity within 18 months. At its core, this plan emphasizes simplicity and sustainability while aligning with organizational objectives. The plan begins with a clear purpose: to prioritize patient safety through elegant simplicity. This guiding principle is operationalized through metrics such as limiting redundant documents and minimizing the steps required to report quality events.
The implementation framework includes cross-functional quality circles tasked with redesigning one process each quarter using visual heuristics like symmetry and closure. These teams also conduct retrospectives to evaluate the cognitive load of procedures and the aesthetic clarity of dashboards, ensuring that elegance remains a central focus. Documentation is treated as a living system, with cognitive learning driven and video micro-procedures replacing lengthy procedures and tools scoring documents to ensure they remain user-friendly.
The roadmap for maturity integrates elegance at every stage. At the standardized level, efficiency targets include achieving 95% on-time CAPA closures, while elegance milestones focus on reducing document complexity scores across SOPs. As the organization progresses to predictive maturity, AI-driven risk forecasts enhance efficiency, while staff adoption rates reflect the intuitive nature of the systems in place. Finally, at the optimizing stage, zero repeat audits signify peak efficiency and effectiveness, while voluntary adoption of quality tools by R&D teams underscores the system’s elegance.
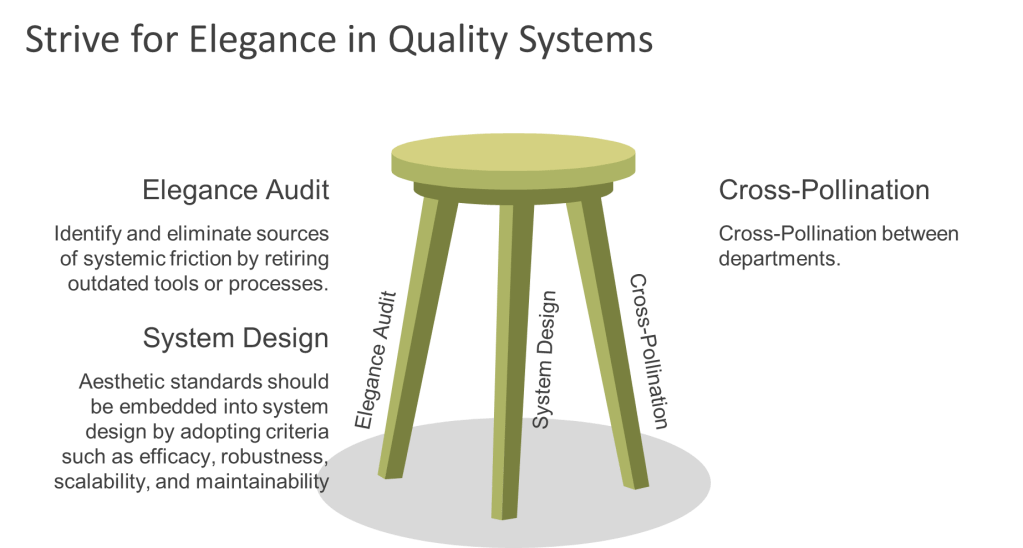
To cultivate elegance within quality systems, organizations can adopt three key strategies. First, they should identify and eliminate sources of systemic friction by retiring outdated tools or processes. For example, replacing blame-centric forms with learning logs can transform near-miss reporting into an opportunity for growth rather than criticism. Second, aesthetic standards should be embedded into system design by adopting criteria such as efficacy, robustness, scalability, and maintainability. Training QA teams as system gardeners who can further enhance this approach. Finally, cross-pollination between departments can foster innovation; for instance, involving designers in QA processes can lead to more visually engaging outcomes.
By embedding elegance into their quality systems alongside efficiency and effectiveness, organizations can move from mere survival to thriving excellence. Compliance becomes an intuitive outcome of well-designed processes rather than a burdensome obligation. Innovation flourishes in frictionless environments where tools invite improvement rather than resistance. Organizations ready to embrace this transformative approach should begin by conducting an “Elegance Audit” of their most cumbersome processes to identify opportunities for improvement. Through these efforts, excellence becomes not just a goal but a natural state of being for the entire system.